This brooch features resin covered paper.
This is a technique I have not used a lot because I think I was waiting for the right tool. That tool is the Westcott Extremedge Titanium scissor! They are the first pair of scissors I have worked with that are strong enough to cut cleanly through thick plastic…which is important for this technique!
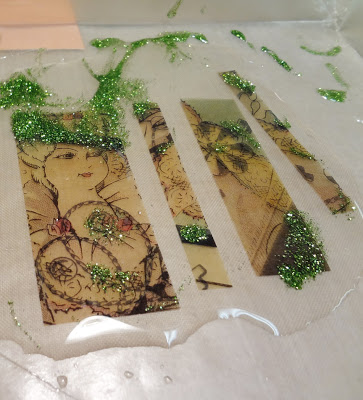
I had this vintage magazine cover on my desk for a while. I really liked the image of the Marie Antoinette-like doll.
When you work with vintage papers and resin you need to know a few things.
1. If you place the paper into the resin, it will quickly absorb and be covered with resin. I soaked my paper in this resin puddle, and then I moved it onto a piece of wax paper to cure.
2. Vintage paper becomes translucent…so the text or images on the reverse side tend to be visible in the front. See that thick black line through the lady? That was on the reverse side of the cover.
I used Envirotex Lite for this project.
That’s when I became creative with glitter. I dropped resin onto the papers in areas I wanted to cover.
About 8 hours later, I used these scissors to cut my papers and resin. The resin did not stick to the blades!!! I then let my cut shapes cure for another 24 hours.
Note how sharp my edges are. My resin is about 1/8 of an inch thick. The wax paper peels off.
That’s how I make resin covered paper!


Niiiiiiice! Love the new scissors.
Awesome! If you don't want the back side of papers to show through seal them first. I love rubbing this type of waterproofing waxlike sealant onto papers before adding resins. It rubs into the givers and keeps the resin from soaking through while providing a different look than a gel medium sealant. Love the glitter though!
When you say wax like sealent….what brand do you use? I just need a tip so I see if I already have some in my stash! I would love to try something other than a gel medium!
Judikins Microglaze. I wasn't where I could look yesterday and didn't remember the name. Just make sure you rub it in good and it doesn't take much. I rub in small circles.
Pretty awesome product. You can seal watercolors with it too. I don't know if you create your own books or not, but I love using it on the bindings and covers as well as on the interiors of art journals sometimes if I'm not wanting runover and think it will occur.
One warning, as I've noticed you enjoy sparkle like I do, if used atop something like a glimmer mist or the twinkling h2o's it can take away some of the sparkle/shimmer. But not always. Expiramentation is necessary when dealing with those type of pigments. It will always add a richness to the paper.
One thing I really love about it is that you can seal and protect images printed off your computer that would normally smear if a gel medium was added to them. Then stick them down with whatever other elements you're using and add a gel medium on top of all of it without it smearing…..or resin it.
It's a must in a mixed media artist's stash once you figure out how to use it to it's fullest abilities, in my opinion. I haven't tried rubbing it into a finer and resining over that yet, like if I didn't want a beautiful antique lace to go transparent, but I have it on my todo list for when I get a break. If you try some, I hope you enjoy it as much as I do. And after you have it rubbed in good, I love using a soft cloth or the pattern/texture free paper towels to buff it up to a rich finish.
I don't know if it is available in local stores. It's not at mine. I got mine around 3 years ago and am still using the same bottle. I think I ordered it through Joannes online, but I could be wrong. Keep up the beautiful work!
I will also describe a stunning technique you can do with resin if you would like that creates one of the most beautiful surfaces I have seen. I would upload a photo if I could, but I'm lacking a computer at this time and do not have a way to do so. I think you would love it and I haven't seen it done anywhere. The sky is the limit on how small or large of surface you use too. I have done this on something with a 2 foot circumference that is now in our bedroom as a focal piece of art. To give credit where credit is due, the beginnings of the idea came from a woman called Rach(some numbers), I used to watch on you tube when I had a reliable computer. I just took her idea a little further. Also feel free to delete this after you read it if you would like to.
1. You will want a hard surface as your base. Chipboard is fine if it's a smaller structure. I've made a 12×12 book cover with chipboard and it was ok. Any larger or depending on it's use, I would use wood. Like say the surface of a jewelry box I'd work on the wood itself.
2. Cut your surface to the shape/size you wish the end product to be. Cover the entire surface that will be transformed with crisscrossing strips of masking tape. The sort of manilla Colored tape used for everything, not artist's tape to mask objects. Make sure to wrap around the edges and leave no empty space. I usually bring the tape an inch into the back if it is a large object or much smaller if a pendant or small book. The key is to create texture here. You want it haphazard and organic.
3. Pick 3-5 colors of alcohol ink and 1 metallic mixitive. You can use less or more, but the metallic is crucial. Just pick a pretty palettes. Apply a layer of colors with an applicator as Tim Holtz would say to do for an agate effect ot like is normally used. (I think you could use Colic, Spectrum Noir, your own, or other alcohol inks. I've used Ranger and some I made from Sharpie markers and both were fine.) Add a second layer with a little metallic added. Once you get a concentration of colors you like, go in with the clear mixative/cleaner and blend. Remember to let dry between layers and to ink the edges. Don't worry if the tape curls up in some areas. Just press it down and continue forward.
4. Now the fun begins. I like to use ArtQuest PPA glossy medium as my glue on this part because it will take a lot of heat from the heat gun before it even thinks about bubbling. Gather up some fantasy film in complimentary colors. (I've used random scrap bits of all sorts of colors. I don't think you can go wrong on color selection with the film.), some fantasy/ angelina fibers (They do not have to be the self bonding because of the ppa, but the ones I have are.), some glass glitter, mica fragments, foils, etc. If it's tiny, sparkles or glimmers, is metallic in color, and won't disintegrate under the heat gun, try it. I have used the beautiful mica chips from ArtQuest, glass glitters from a variety of companies, and the various shaped glitters and foils put out by Martha Stewart, the Michael's brand I can't think of,Stampendous, etc. I haven't done this technique since Ranger released their dry glitters but I bet they would work. The key is not to add everything at once. You want to build up some layers for depth.
Start with the fantasy film. Cut it up into tiny irregular squares. Think confetti and just let your scissors do a happy dance. Cover the entire surface with a thin layer of ppa and then sprinkle the film around. You can place it specific areas if you only want it there, but for the first time doing this technique I would say random is best. Use it sort of sparingly because the key is texture. You want your different layers to mingle and show through one another. Press the films down good and then hit it with your heat gun until the ppa dries. Move the gun around so as not to burn or bubble the glue, but don't worry when bits of the film start melting and curling up. It's part of the beauty in the end. Add another layer of ppa and pull apart some of the fantasy fibers. I add this part in very fine wisps, like a phantom of color sweeping and puddling across the surface. Again, less is more until you get a feel for it. Some colors heat more muted and others even a single strand pops vividly. Press them in and heat again. They will crinkled and melt.
At this time look over your piece. You should start to see where it is going and you can judge if you need more of either. If so, just create another layer. Next comes the mica, glitters, and foils. I tend to add all of these in a single layer or two, not bothering to give each item their own layer. I forgot to say this before, but if you have embossing powders you can add some of them before applying the films or now. Just sponge some embossing ink and lightly scatter. Be careful because it might stick in other areas and you'd have to wipe it away before melting as normal. Embossing powders can add a beautiful feel, but can very easily over power the piece. I would not use them my first time doing it. As far as the glitters etc go, add a layer of ppa and then scatter those elements in little puddles, thin rivers, gossamer sprays. The tiny micro beads are great for this too. Think as if building an enchanting and exquisite fabric for a mermaid's gown. Dry with the heat gun and see if you want to add more of any element. If you do, just add more ppa and keep layering. If you have glimmer mists, it can be fun to add tiny hints of gold, copper, silver, pearl, or bronze between different layers depending on your color scheme. You could use other colors as well. Those are just personal choices. Once you have it looking like the treasure trove it is, add a final layer of ppa and make sure that the entire piece is dry before moving on. If not, you will end up with a cloudy or whitish muddled area in the resin.
5. And now the step that takes something that is already gorgeous and could be used as is with a few more coats of sealant to hold everything in place good if you wanted to, – the resignation sensation!!!
A note. I have only used one type of resin when doing this. With different resins being made of different ingredients, I do not know how all would react. I've made a horrific bubbly mess before when using some of these elements in other resins. I do know that the jeweler's grade resin I use works great, so I would use the one closest to that. Also make sure to protect your worksurface as you would when creating resin paper.
You will need a brush with synthetic hairs to help spread the resin. Don't worry about it flowing over the edges since you can clean it up afterwards, but if making a bookcover or something where the edges show, try to keep it as neat as possible. Mix up just enough resin to cover, since it is self leveling creating a thick layer in one go is impossible unless you've built a form. Once it dries, you can always add another layer. And of course if you would like to create a solid, mineral like focal in a mold you could cut a piece of chipboard to fit the back base and go through the different steps on it and then add more layers within the resin building backwards.
Once the technique is down, obviously charms, brass pressings, rhinestones, pearls, etc can be added. It makes a stunning backdrop in bezels with like a mermaid, faerie, greenman, muse, etc charm etc added and then resin domed over it. Three dimension metal flowers are also gorgeous when reversing the process in a domed mold. The focal pendants and small bezelled bracelets and rings made with this are stunning one of a kind creations that look just as good if not better than some simmilar high end fashion jewelry pieces I paid a lot for back before I became a technique freak and started learning how to do so many things myself.
I wish I had photos to make it easier to understand, but I don't think you'll have a problem following and envisioning as you already use all of the products or similar ones in the same ways. I hope that you are as delighted by your results if you try it ad anyone who has ever seen or received pieces from me has seemed. Mostly, I hope reading this inspires you and that you have fun in the exploration. Your blog rocks. The time and effort you put into it is incredible. And the detail in which you share your discoveries, treasures, and mistakes is a great tool for anyone wanting to dip their toe in the resin world. I send anyone that seems interested here and I bet many others do too. The effort and love you put into what you do does not go unnoticed. Thank you so much for sharing your explorations and adventures with this incredible medium. You inspire me. 🙂