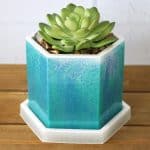
DIY Ombre Epoxy Planter
Home your plants in a colorful DIY Ombre Epoxy Planter using Amazing Deep Pour Epoxy and vibrant mica powders!
Materials
- Alumilite Amazing Deep Pour Epoxy
- Mixing cups and stirring sticks
- Disposable Gloves
- Color Creator Pacific Gift Pack Mica Powder - Blue Green Metallic, Ocean Blue Metallic & Diamond Dust
- Silicone Hexagon Planter & Base Mold
Instructions
PREPARE THE DEEP POUR EPOXY
- Prepare 7-8 ounces of of Amazing Deep Pour Epoxy according to package directions, and follow all safety guidelines. Pour in 2:1 (2 part A to 1 part B) into a mixing cup. Stir the resin mixture together SLOWLY with a stir stick for about 3 minutes, and then pour the resin into a clean mixing cup. Stir again for another minute or two with a clean stir stick. If the resin still has streaks running through it, keep mixing until it becomes clear.
COLOR EPOXY WITH COLOR CREATOR
- Pour 2 ounces each of the mixed resin into two cups, and leave the rest in the original mixing cup. Add a generous amount of Blue Green Metallic Color Creator mica powder into one of the 2 ounce cups, and some Ocean Blue Metallic mica powder into the other. Stir each resin mixture with a clean stir sticks until completely combined. Add some Diamond Dust mica powder to the remaining resin, and stir well to combine.
POUR THE EPOXY
- Start by pouring the epoxy mixed with Diamond Dust into the base mold (that looks like a coaster) first, and fill it all the way to the top. Slowly pour the rest of the resin into the planter mold. You will get less bubbles in your project if you pour the resin over the center and let it run down to the bottom.
- Let the resin rest in the base mold for about 10 minutes to give the air bubbles time to come to the surface. Next, use a heat gun, blow through a straw, or lightly spritz the mold with 91% alcohol to remove surface bubbles. We're done with this mold, so set it aside to allow the resin to cure.
- Slowly pour the entirety of the Blue Green Metallic epoxy mixture over the center of the mold. Let it run down to fill up the mold above the white Diamond Dust layer. If you want to help "push" some of the color down to blend the edges of color, you can gently poke the stir stick into the resin on each side of the hexagon.
- Lastly, pour the Ocean Blue Metallic resin mixture over the center of the mold, and fill it up the rest of the way. Again, if you want to push the blue color into the green a little, just gently poke the stir stick down a little bit on each side of the hexagon mold.
- This is a deep mold with a lot of resin, so it will take a little bit longer to cure than most projects. Let the resin rest for 10-20 minutes to give the air bubbles time to come to the surface. Then, use a heat gun, blow through a straw, or lightly spritz the molds with 91% alcohol to remove surface bubbles. Leave the resin to cure in an undisturbed, well ventilated area for at least 36 - 72 hours (temperature and climate dependent).
- Remove the epoxy planter from the mold.
- Use scissors or a craft knife to carefully remove any over-poured epoxy, and sand down the edges if necessary. If you do sand the resin, you can re-seal the areas with Resin Spray.