Gold Leaf Resin Paperweights DIY
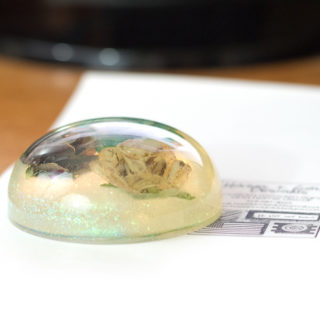
Hey Resin Crafters, it’s Natalie from Doodlecraft with an especially amazing resin craft. Gold leaf is so stunning, however it is very delicate also. For this reason, encasing the gold leaf in resin is the perfect juxtaposition. Used as a paperweight, magnet on the fridge or add a ribbon to hang on the tree as an ornament. Makes a great handmade gift as well.
 Gather Supples:
Gold Leaf
Mixing cups/stirring sticks/disposable gloves
Silicone Mold
Read the instructions thoroughly on the Clear Polyester Casting Resin. Mix it according to the directions in the mixing cups while wearing gloves. Do not add the dye yet, keep it clear. Pour about 1/4 inch of resin in each mold opening. Working on a disposable table cover is great for clean up too.
Now let the resin sit and “gel” for 30 minutes.
Next, add pieces and curls of gold leaf right on top of the clear resin. Let it sit 30 minutes again.
Next mix up more clear resin. For a clear finish, pour directly on the gold leaf. Conversely if you prefer the black finish, mix some of the black pigment in the resin. Mix well and pour to the top of the mold. Now, patiently wait for the resin to cure, at least overnight.
Finally, pop the resin paperweights out of the mold and enjoy the uniquely amazing finish!
Use some E6000 and glue a magnet on the backside for a gorgeous magnet or left as is for an especially stunning paperweight.
Pictures cannot do the gold leaf justice. It’s like a falling leaf frozen in time! Perfect for holding calligraphy or other hand lettering in place on the desk or fridge.
Like, Follow, Comment, Save and pin for later!
Natalie Shaw is a Craft/DIY blogger at Doodlecraftblog.com. She loves sci-fi, fantasy and video game geekery and that comes out in many of her projects. She posts budget conscious DIY’s, crafts, jewelry, kid friendly projects, upcycled treasures and other fun on her blog 5 days a week.


Leave a Reply