• About Us
  • FAQ
  • Contact Us
  • Shop Supplies
  • Email
  • Facebook
  • Instagram
  • Pinterest
  • Twitter
  • YouTube
  • Skip to primary navigation
  • Skip to main content
  • Skip to primary sidebar

Resin Crafts Blog

Resin crafting projects and tutorials

  • Home
  • Resin Projects
  • Molds
  • Project Type
    • Jewelry
    • Home Decor
    • Art
    • Gift Ideas
    • Crafts
  • Resin Tips

Protecting and Decorating Found Rocks for Decor

by Whitney J Leave a Comment

Share
Pin59
Tweet
59Shares
If you love to hoard rocks, you’ve gotta check out this DIY project. See how you can protect and decorate found rocks for décor around your home. via @resincraftsblog

Protecting and decorating found rocks for décor | whitney j décor| resin diy projects | painted rocks | display rocks project | Diy rock project | decorating rocks | styling a home with rocks | rock décor | rock styling | resin rock project | envirotex lite projects | resin craft projects |

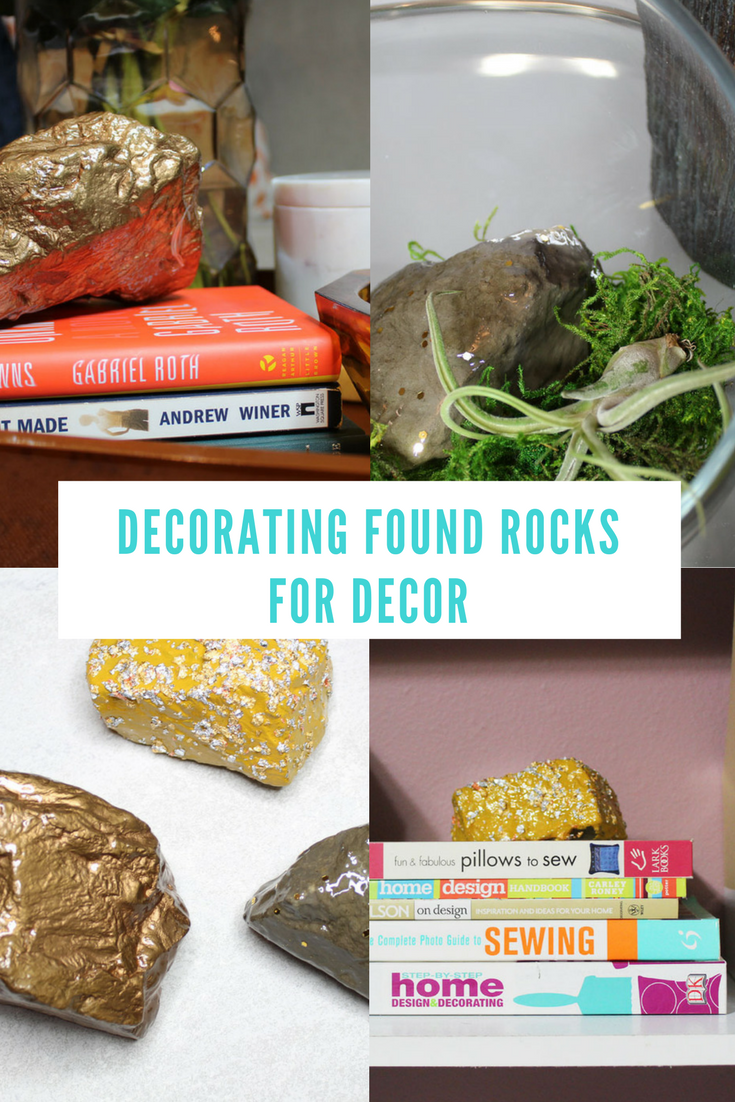
Am I the only one that hoards rocks while out fishing and on the beach? On a recent fishing trip a few months ago, I grabbed way too many rocks (I’m embarrassed to say I had to go to my car four times to drop them off when my bag got too heavy) with no intention on how to use them. When we were done fishing and on our way home, I figured they would be great to line my garden with, but also knew I would paint a few to use around the home for styling.

Protecting and decorating found rocks for décor | whitney j décor| resin diy projects | painted rocks | display rocks project | Diy rock project | decorating rocks | styling a home with rocks | rock décor | rock styling | resin rock project | envirotex lite projects | resin craft projects |

The thing about painting something so small, though… if you don’t protect the paint finish, you’ll see scratches and marks as soon as you start moving the pieces around. And, because, I KNOW that I have a tendency to style and style and style again every surface in my home, I knew I’d like to protect the paint finish of any rocks that I decided to paint.

Cue the EnviroTex Lite…

I’ve used EnviroTex Lite a few times and I love it. I used it on my bar top makeover and also to seal some fun wallpaper on paper trays in my office, so I know how easy it is to use. I also really love the durable, glass-like finish you get with this product.

Protecting and decorating found rocks for décor | whitney j décor| resin diy projects | painted rocks | display rocks project | Diy rock project | decorating rocks | styling a home with rocks | rock décor | rock styling | resin rock project | envirotex lite projects | resin craft projects |

This is a really easy project. Let me show you how to do it!

Here’s what you need:

Supplies:

  • EnviroTex Lite
  • Mixing cups
  • Stir sticks
  • Plastic bags or drop cloth to protect your surface
  • Paint
  • Embellishment for your rocks (if you want to)
  • Rocks of any size

Protecting and decorating found rocks for décor | whitney j décor| resin diy projects | painted rocks | display rocks project | Diy rock project | decorating rocks | styling a home with rocks | rock décor | rock styling | resin rock project | envirotex lite projects | resin craft projects |

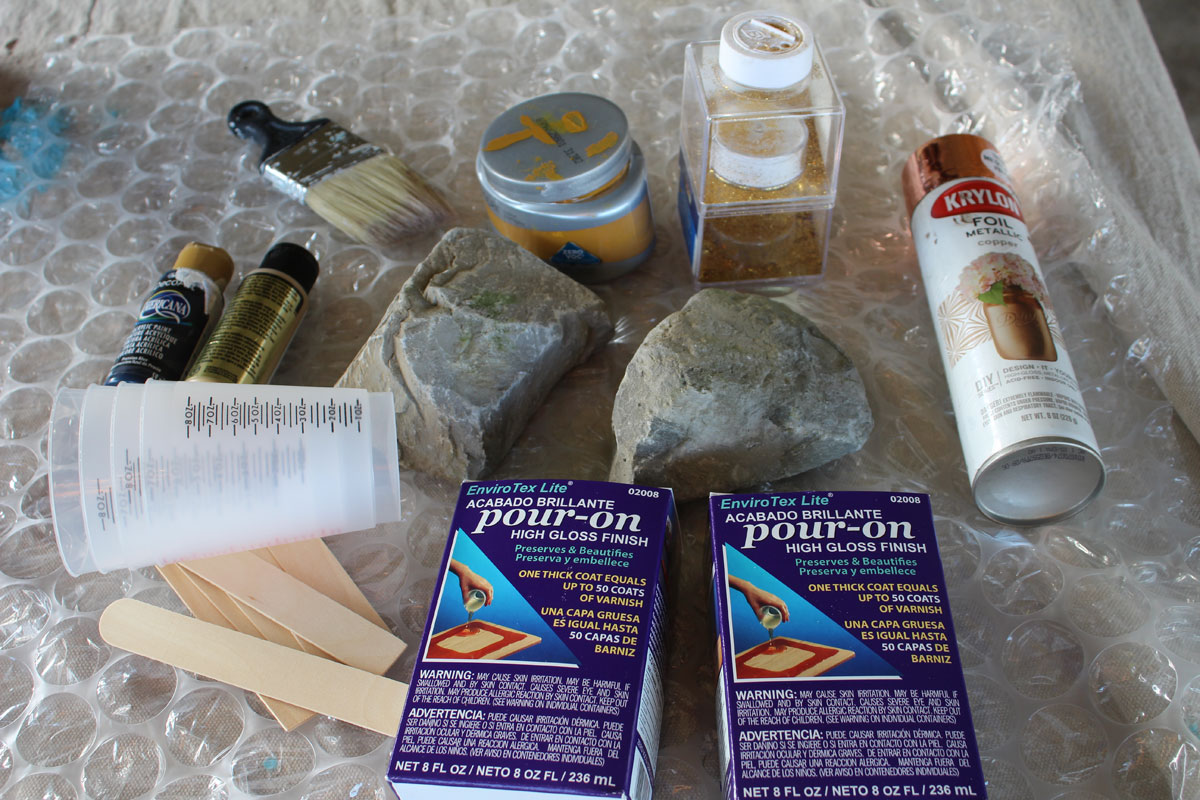
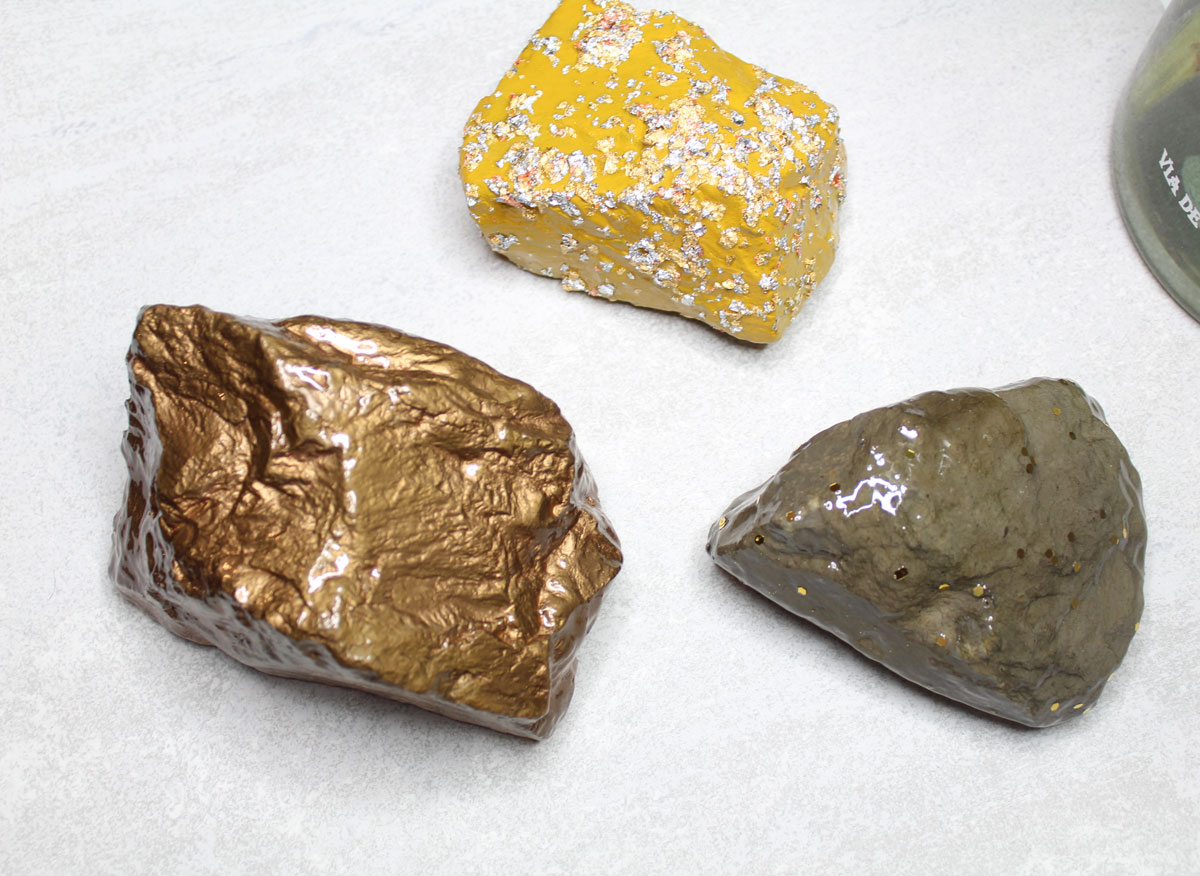
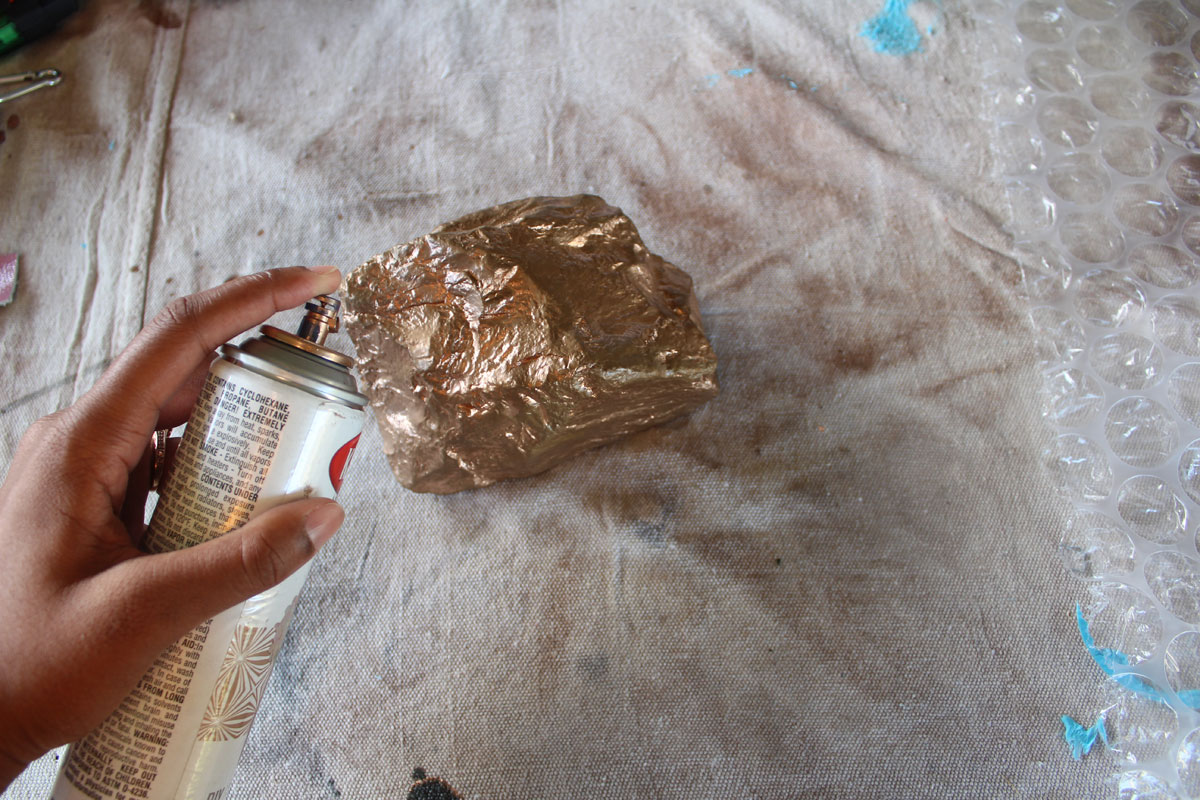
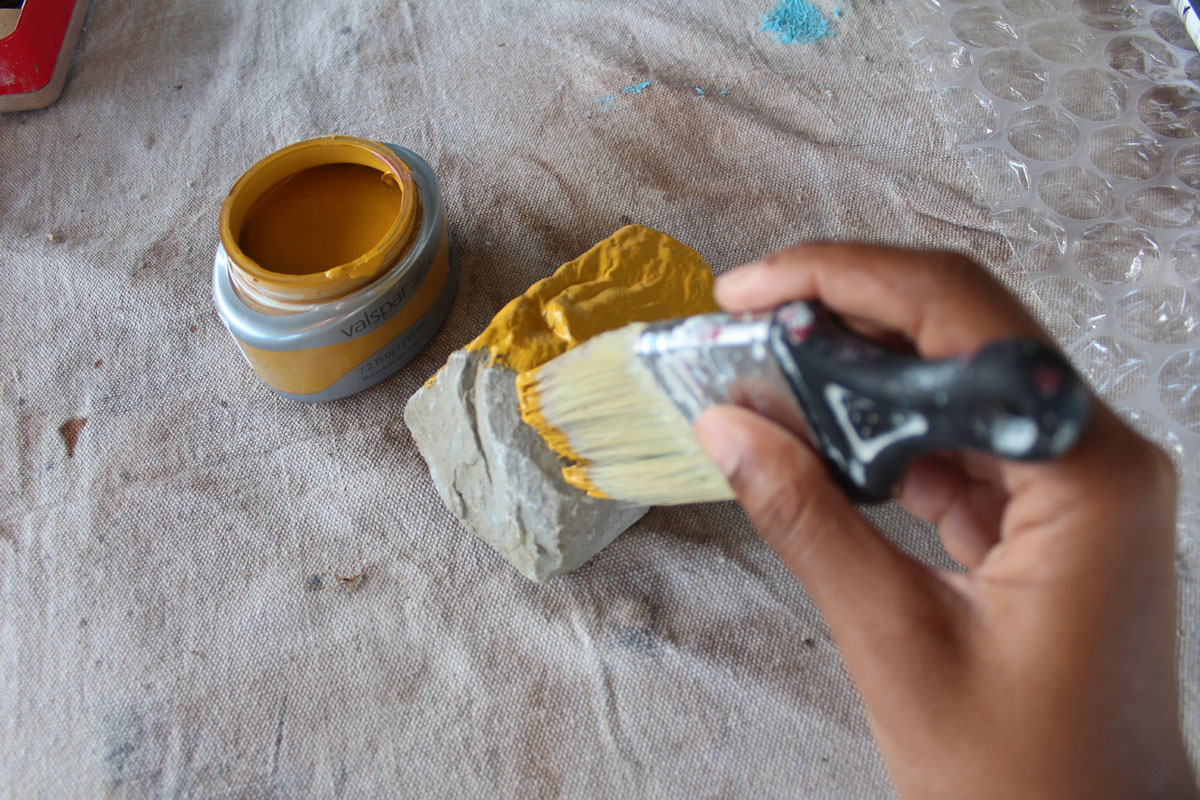
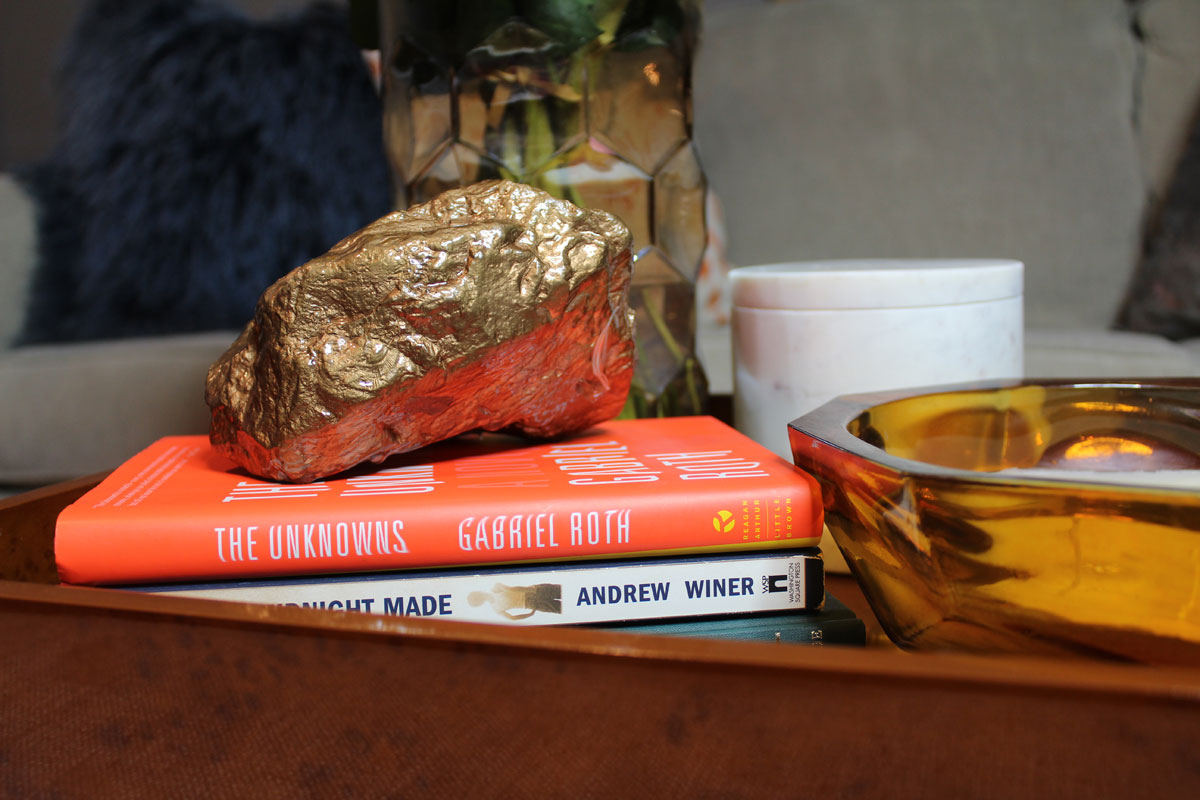
This is a really easy project to do. First, you need to wash and dry all your rocks. Then, you paint your rocks. I spray painted one with a copper metal spray paint, one with a brush and a yellow/mustard paint sample, and one I decided not to paint at all.

Protecting and decorating found rocks for décor | whitney j décor| resin diy projects | painted rocks | display rocks project | Diy rock project | decorating rocks | styling a home with rocks | rock décor | rock styling | resin rock project | envirotex lite projects | resin craft projects |

Protecting and decorating found rocks for décor | whitney j décor| resin diy projects | painted rocks | display rocks project | Diy rock project | decorating rocks | styling a home with rocks | rock décor | rock styling | resin rock project | envirotex lite projects | resin craft projects |

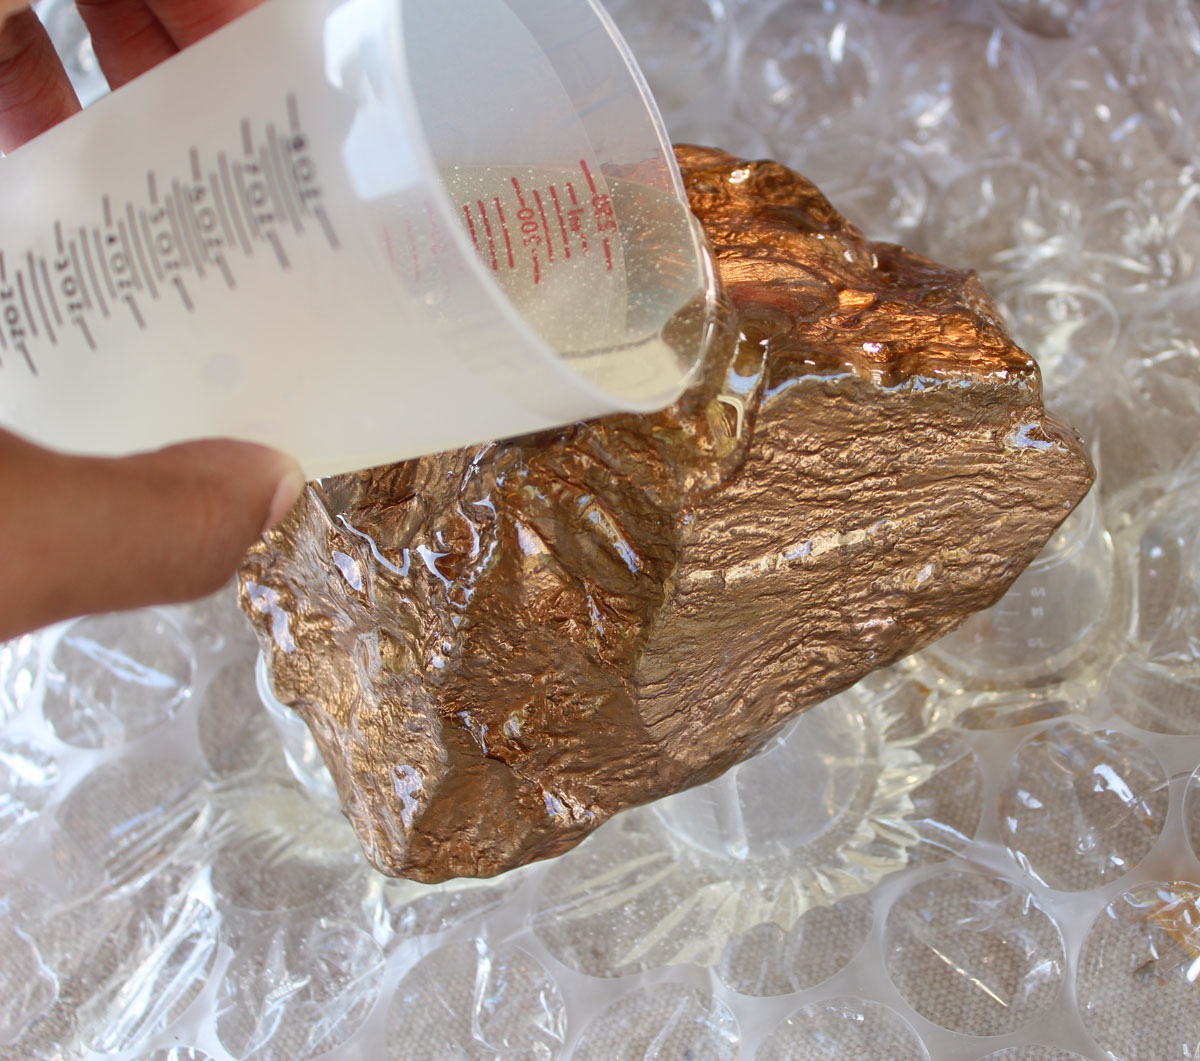
Once your paint is completely dry (make sure you get around the entire rock), you need to elevate your rocks on top of something. I used tiny mixing cups. Then, you mix the EnviroTex Lite. Make sure you protect your surfaces with plastic bags or plastic drop cloths.

Mix equal amounts (by volume) of both parts of the EnviroTex Lite for a full 1 minute. Then, pour the mixture into a second, clean mixing cup and mix for another 30 seconds. Scrape the sides of the cups throughout stirring.

Protecting and decorating found rocks for décor | whitney j décor| resin diy projects | painted rocks | display rocks project | Diy rock project | decorating rocks | styling a home with rocks | rock décor | rock styling | resin rock project | envirotex lite projects | resin craft projects |

For the copper painted rock, I kept my mixture clear and poured it right away on top of the rock.

Protecting and decorating found rocks for décor | whitney j décor| resin diy projects | painted rocks | display rocks project | Diy rock project | decorating rocks | styling a home with rocks | rock décor | rock styling | resin rock project | envirotex lite projects | resin craft projects |

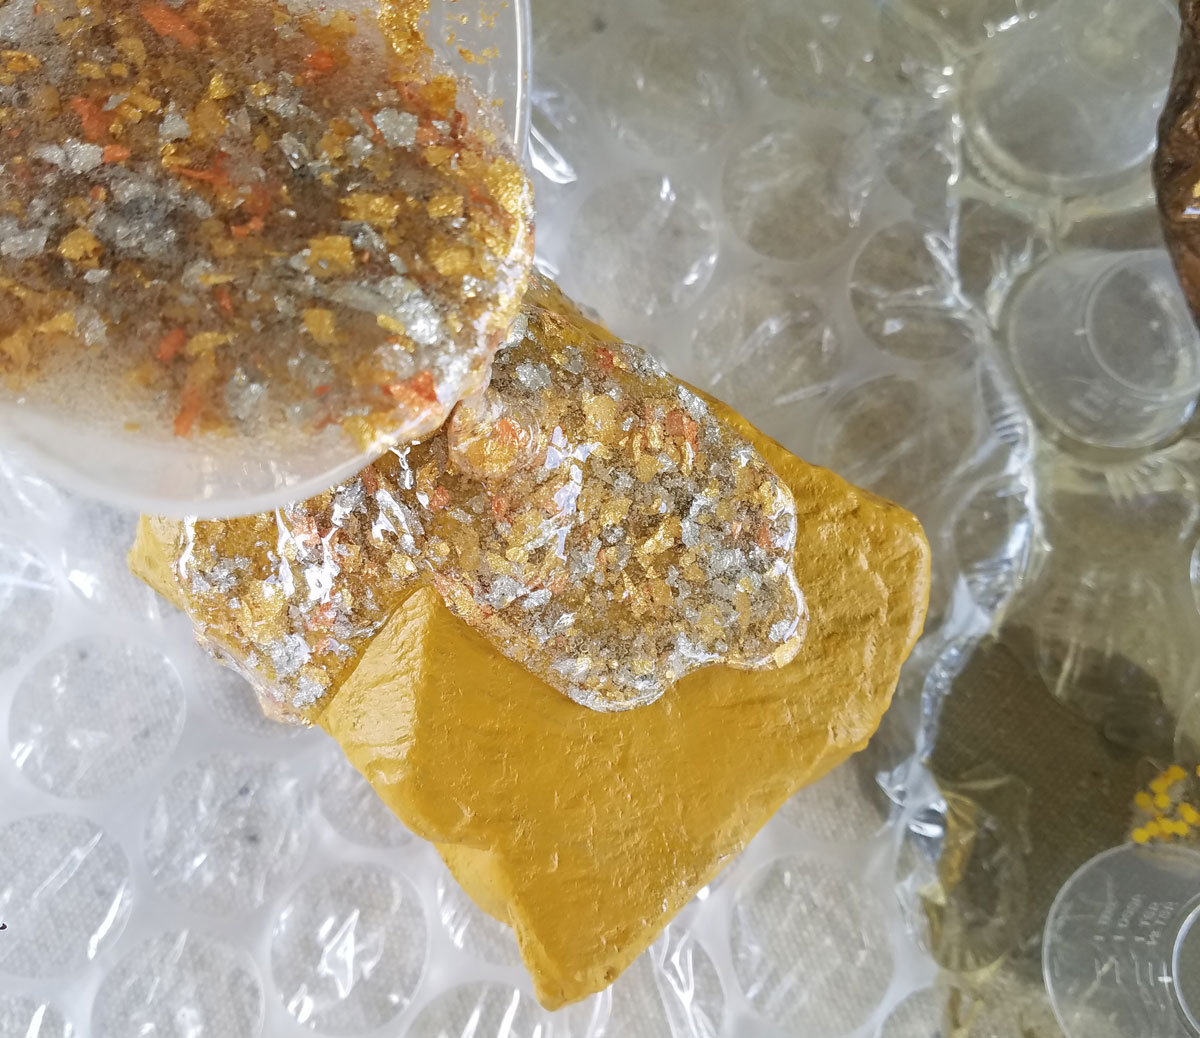
If you want to add embellishments, add them to your mixture right before you pour.

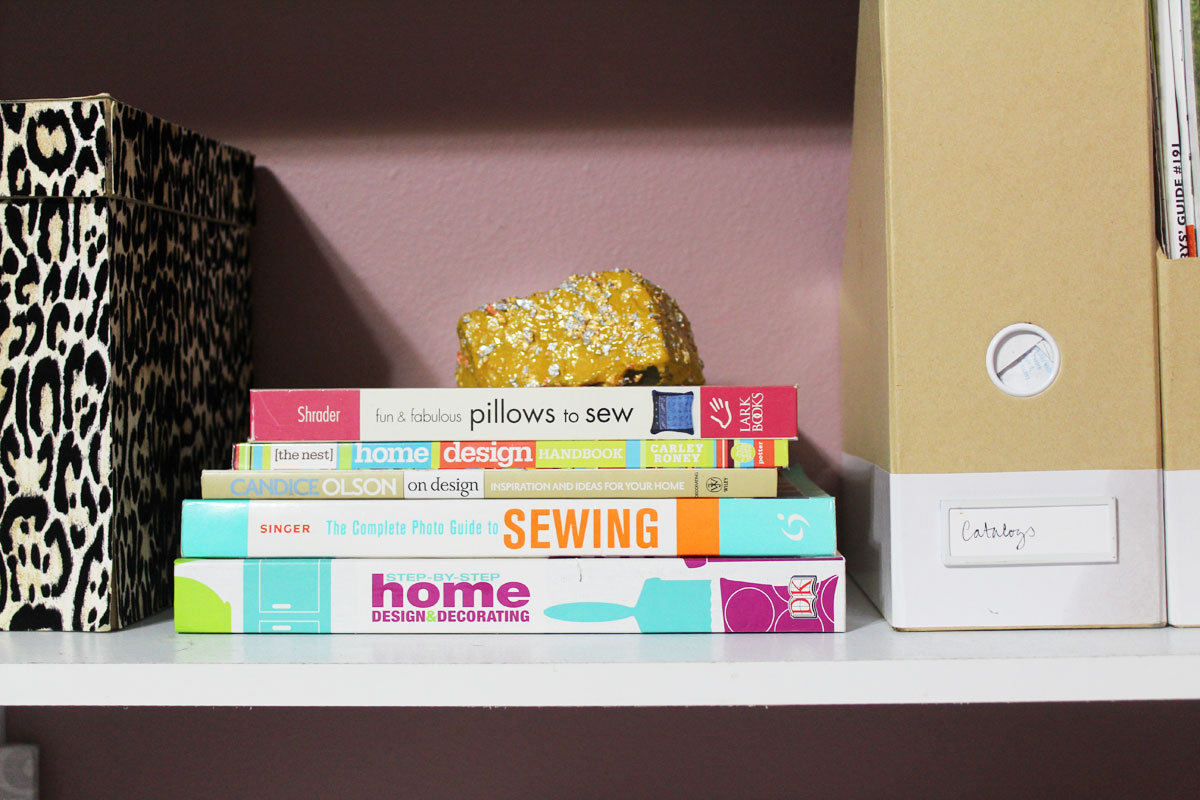
For the yellow/mustard rock, I added some gold, copper, and silver leaf sheets right before I poured.

Protecting and decorating found rocks for décor | whitney j décor| resin diy projects | painted rocks | display rocks project | Diy rock project | decorating rocks | styling a home with rocks | rock décor | rock styling | resin rock project | envirotex lite projects | resin craft projects |

Protecting and decorating found rocks for décor | whitney j décor| resin diy projects | painted rocks | display rocks project | Diy rock project | decorating rocks | styling a home with rocks | rock décor | rock styling | resin rock project | envirotex lite projects | resin craft projects |

I added a little gold glitter to my mixture to pour over my unpainted rock.

Protecting and decorating found rocks for décor | whitney j décor| resin diy projects | painted rocks | display rocks project | Diy rock project | decorating rocks | styling a home with rocks | rock décor | rock styling | resin rock project | envirotex lite projects | resin craft projects |

Protecting and decorating found rocks for décor | whitney j décor| resin diy projects | painted rocks | display rocks project | Diy rock project | decorating rocks | styling a home with rocks | rock décor | rock styling | resin rock project | envirotex lite projects | resin craft projects |

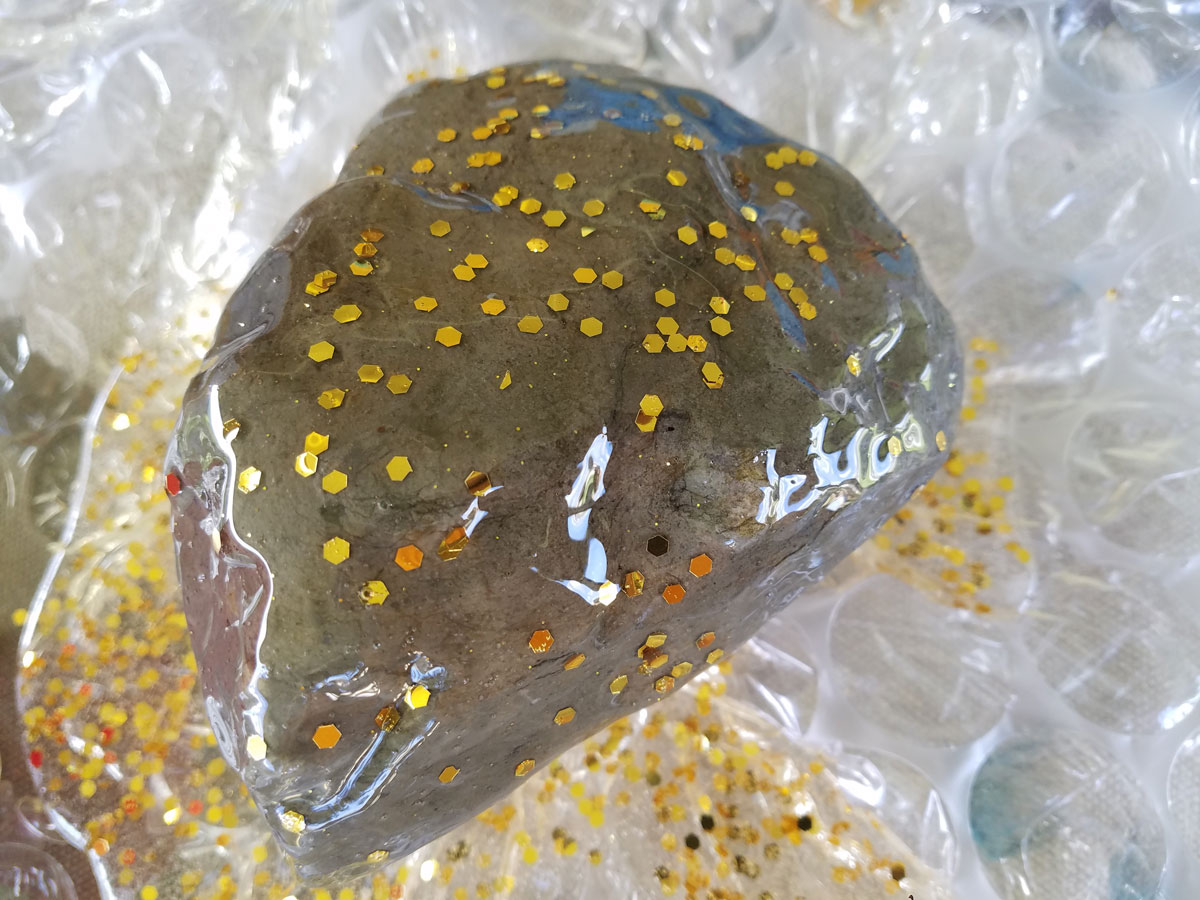
You’ll need to check on your rocks in about 10 minutes, to catch the drips and pour back over the rock. Let completely cure, turn your rocks over and repeat, so that your entire rock is protected.

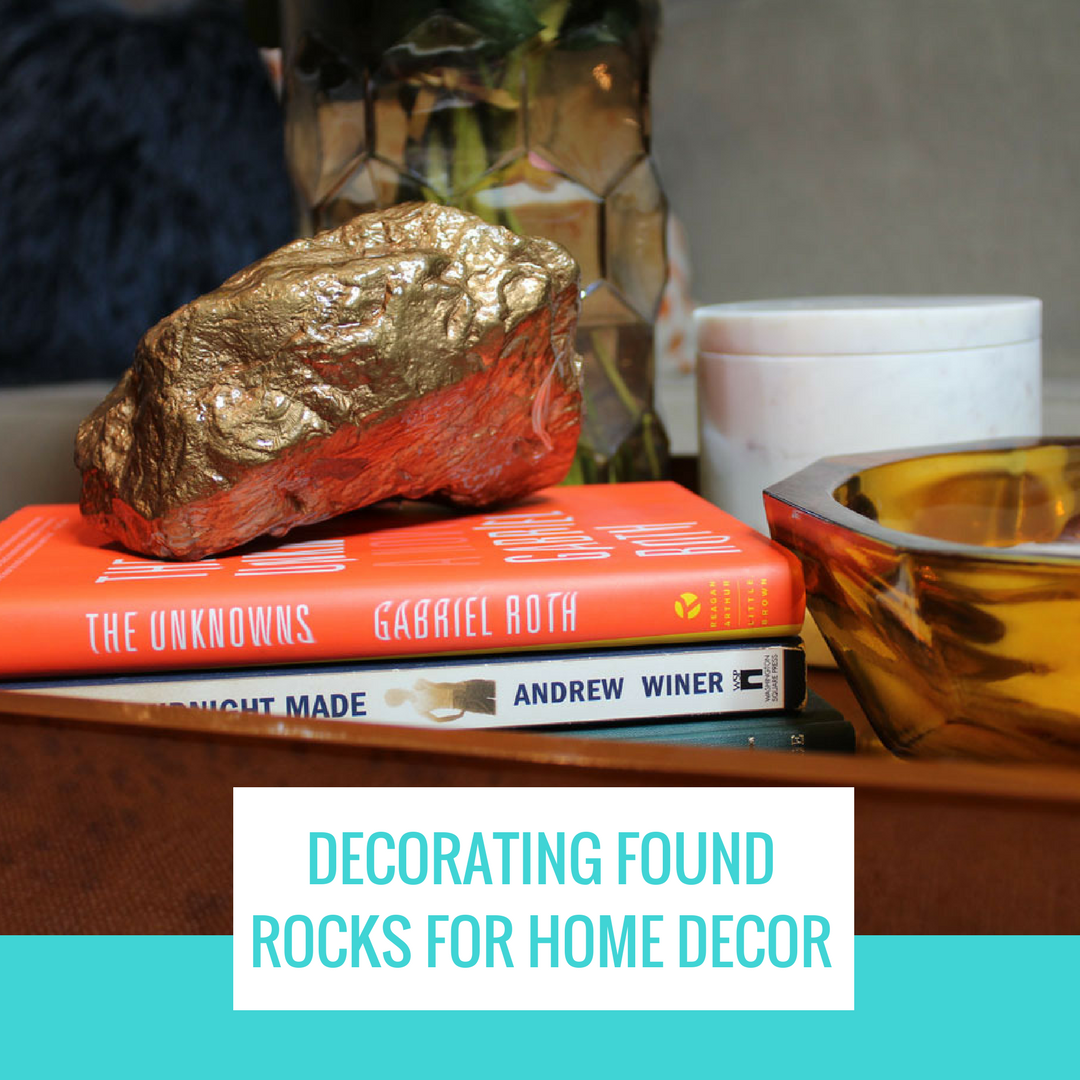
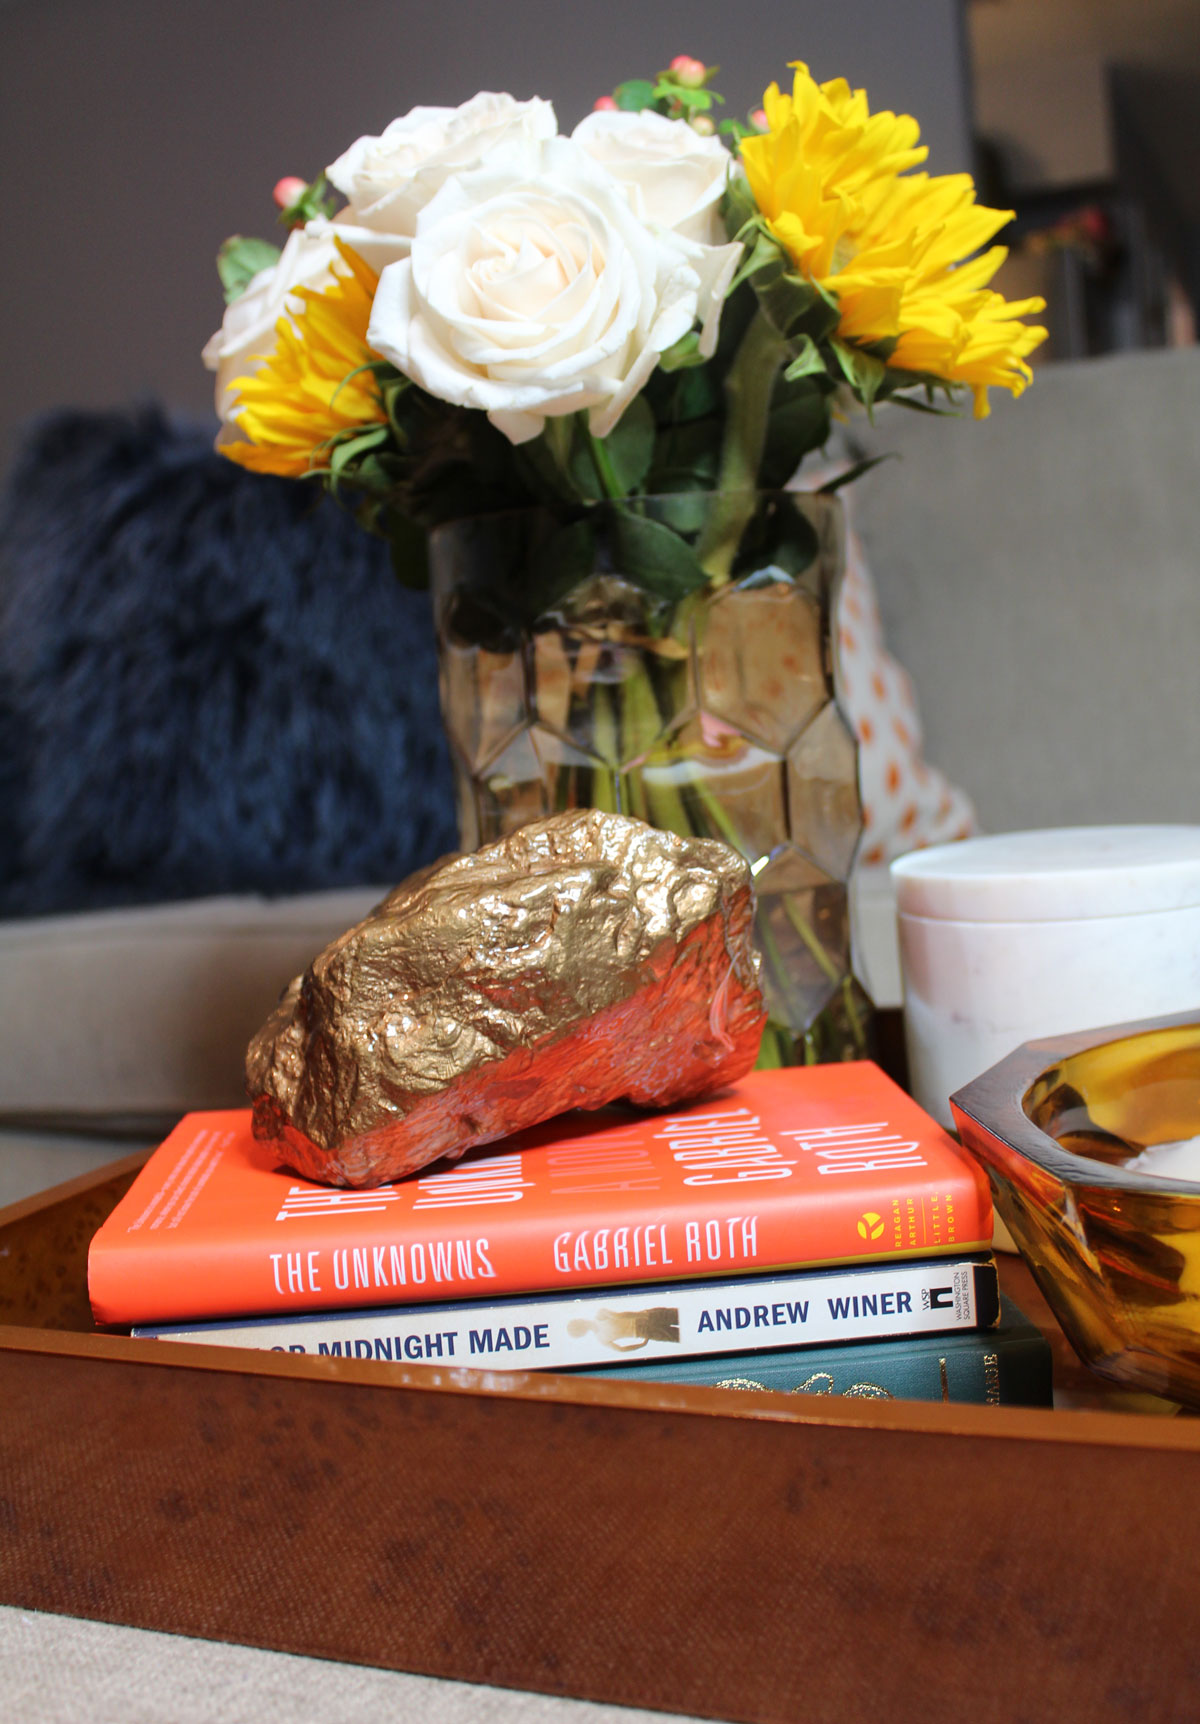
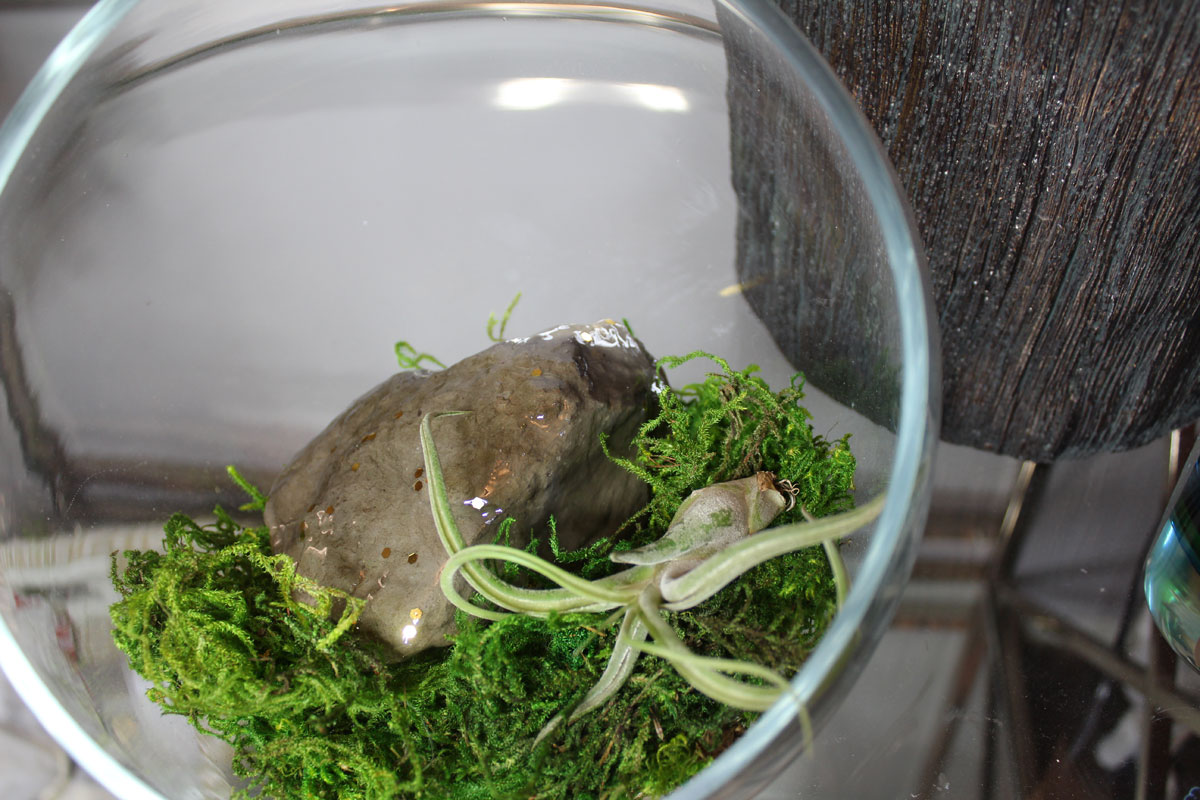
Once cured, you can use your rocks for styling!

Protecting and decorating found rocks for décor | whitney j décor| resin diy projects | painted rocks | display rocks project | Diy rock project | decorating rocks | styling a home with rocks | rock décor | rock styling | resin rock project | envirotex lite projects | resin craft projects |

Protecting and decorating found rocks for décor | whitney j décor| resin diy projects | painted rocks | display rocks project | Diy rock project | decorating rocks | styling a home with rocks | rock décor | rock styling | resin rock project | envirotex lite projects | resin craft projects |

Protecting and decorating found rocks for décor | whitney j décor| resin diy projects | painted rocks | display rocks project | Diy rock project | decorating rocks | styling a home with rocks | rock décor | rock styling | resin rock project | envirotex lite projects | resin craft projects |

Protecting and decorating found rocks for décor | whitney j décor| resin diy projects | painted rocks | display rocks project | Diy rock project | decorating rocks | styling a home with rocks | rock décor | rock styling | resin rock project | envirotex lite projects | resin craft projects |


SaveSave

SaveSave

Whitney J
Whitney J

Whitney is a New Orleans based decorator blogging about all things home. She loves to sew and create fabulous pillows and other furnishings. When Whitney’s not working on design projects, she’s reading sci-fi novels, working in her garden, or making updates in her new home.

Share
Pin59
Tweet
59Shares

If you enjoyed this...

  • 10 Fun DIY Printable Travel Activities To Keep The Kids Busy
    10 Fun DIY Printable Travel Activities To Keep The Kids Busy
  • Using an Oversized Wood Pool Ball to Make a Lucite Inspired Bookend
    Using an Oversized Wood Pool Ball to Make a Lucite Inspired…
  • Fairy Garden with a Pool
    Fairy Garden with a Pool

Filed Under: Crafts, Home Decor, Resin Projects

Previous Post: « Faux Stained Glass Christmas Ornament
Next Post: Resin Photo Christmas Ornaments with EasyCast »

Reader Interactions

Leave a Reply Cancel reply

Thank you so much for leaving a comment on Resin Crafts Blog! For technical questions you can email our customer service at: [email protected] or via telephone @ 1-800-368-9323.
Recipe Rating


This site uses Akismet to reduce spam. Learn how your comment data is processed.

Primary Sidebar

color creator evergreen ad
promise epoxy new year new home
upstart evergreen ad

Pin With Us

Categories

Resin Crafts Blog is a participant in the Amazon Services LLC Associates Program. As an Amazon Associate we earn from qualifying purchases.

Copyright © 2023 Resin Crafts