Safety first! Any time you create with resin, make sure that you’re working in a well-ventilated area, are wearing protective eyewear and gloves, and always cover your workspace in case of spills.
If you don't have any leftover resin, you can create your own resin mosaic pieces! Prep your flat silicone mat/mold with Mold Release and Conditioner Spray and let it dry completely. This will help to make sure your project comes out perfectly and will also extend the life of the mold.
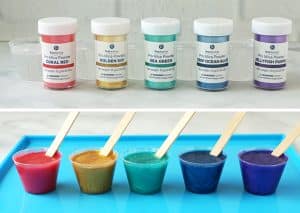
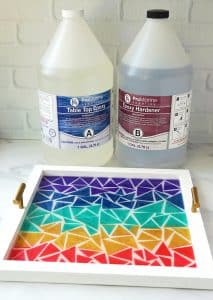
Mix up 4–5 ounces of Promise Table Top Epoxy according to package directions, and follow all safety guidelines. Pour in equal parts resin and hardener into a mixing cup. Stir the resin mixture together SLOWLY with a stir stick for two minutes. Next, pour the resin into a clean mixing cup and stir the resin again for another minute or two with a clean stir stick. If the resin still has streaks running through it, keep mixing until it becomes clear.
Split the resin equally into five smaller mixing cups. Add a little bit of each color of Color Creator mica powders to the cups. A little bit of colorant goes a long way, so start small and add in more if necessary. Stir the resin cups using clean stir sticks until the powder is completely combined.
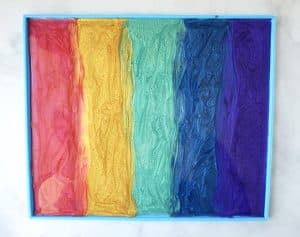
Pour the resins onto the mat, starting with the red and purple on the ends, then adding the green in the center. Lastly, fill the empty spaces with the gold and blue resins. Use a stir stick to spread the resin to the edges of the mat, and gently blend the lines between each of the colors. The resin should be 1/4" thick at the most.When all of the resin has been poured, use a butane torch, blow through a straw, or spritz the resin with alcohol to remove surface bubbles. Leave the resin to cure in an undisturbed area for at least 24 hours. You will know that the resin is cured and ready to be removed from the mold when the surface is no longer tacky and pulls away from the mold edges.
While the resin is curing, use this time to prep your tray. I used a 12"x12" wood canvas, turned upside down. Sand all of the edges well, and then cover it with a coat or two of white acrylic paint. There are so many options out there for tray bases, so use whatever works for you and your personal style. As long as it has some kind of an edge around it, it will work beautifully.
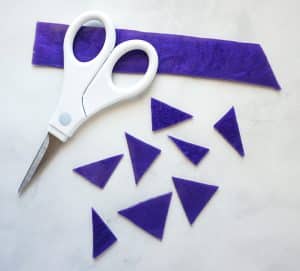
Remove the resin from the mat, and lay it down on your workspace. If the resin is still flexible, don't worry–it actually makes this step a bit easier! As long as the resin isn't tacky, you're good to go. Use a pair of strong craft scissors and cut colored resin apart into 1"–2" wide strips. The longer you let the resin cure and harden, the tougher it will be to cut.
Next, use the scissors to cut each colored strip of resin into triangles. I would recommend making sure that the pieces vary in size and angle for best results. If you are having a hard time cutting, you can gently warm the resin using a heat gun or hair dryer. The heat makes the resin more flexible, giving you a bit of extra time to make cuts.
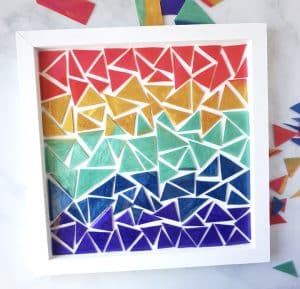
Start with the red resin pieces and arrange them along the top edge of the tray base, but not touching each other. Once you've fit the pieces along the edge, add more triangles just below the pieces, but make sure they aren't touching. I added about 2 lines of each color (3 for green) to fill the tray. This is probably the hardest part of the entire project, but only because it's like trying to complete a puzzle that you don't have the solution to!Tips: You may need to trim pieces to fit into empty spaces. Also keep in mind that the pieces will shift if you bump them, so work on a steady surface with a lot of room. Once all of the resin pieces are in the tray, you can use a small drop of clear adhesive to keep them in place. This is totally optional, but it was extremely helpful for me to not have to worry about the pieces shifting. Let the adhesive dry completely before moving on to the next step.
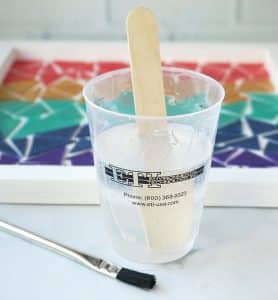
Mix up 6 ounces of Promise Table Top Epoxy according to package directions, and follow all safety guidelines. Pour in equal parts resin and hardener into a mixing cup. Stir the resin mixture together SLOWLY with a stir stick for two minutes. Next, pour the resin into a clean mixing cup and stir the resin again for another minute or two with a clean stir stick. If the resin still has streaks running through it, keep mixing until it becomes clear. To keep bubbles to a minimum, try to not lift the stir stick from the bottom of the cup, and stir in only one direction.
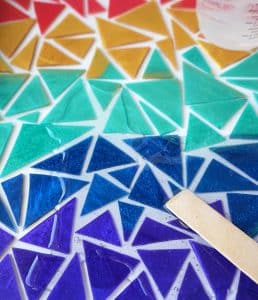
Pour a small amount of resin into the tray, right on top of the cut resin pieces. Use the stir stick or a resin brush to spread the resin out to fill in the space between the resin pieces first. Doing this instead of just dumping all the resin in at once helps to prevent too many bubbles from getting trapped in the resin.
Once the base has been filled, slowly pour the rest of the resin into the tray. Let the resin "rest" for 5–10 minutes and let the bubbles rise to the top. Use a butane torch, blow through a straw, or spritz the resin with alcohol to remove surface bubbles. Leave the tray to cure in an undisturbed area for at least 24 hours. You will know that the resin is cured when the surface is no longer tacky.
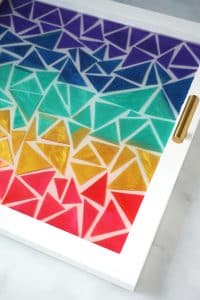
Drill a small hole in the center edge of each side of the tray and attach the tray handles or knobs. If you don't want to drill a hole, you can use some strong adhesive to hold them in place instead.
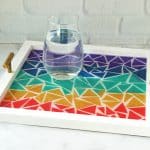
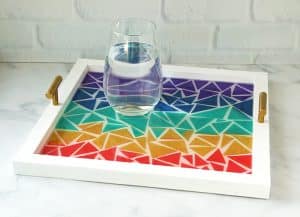
Now that the tray is complete, you can use it for practically anything! Place your favorite jewelry and trinkets to keep on a vanity, or use it for serving your favorite snacks and beverages. Either way, this is such a unique and eye-catching piece of decor that really makes a statement in any part of your home.