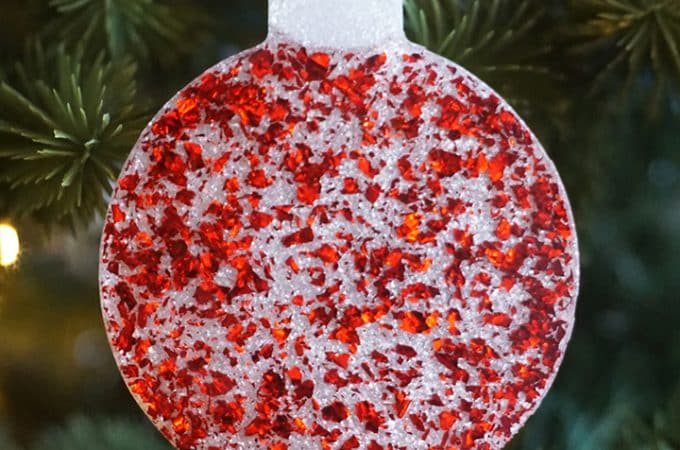
One-time purchase:
$58.99 $0.46 per Fl Oz
FREE delivery Saturday, February 22
Ships from: Promise Epoxy
Sold by: Promise Epoxy
FREE delivery Saturday, February 22. Details
In Stock
$$58.99 () Includes selected options. Includes initial monthly payment and selected options. Details
Price
Subtotal
$$58.99
Subtotal
Initial payment breakdown
Shipping cost, delivery date, and order total (including tax) shown at checkout.
Ships from
Promise Epoxy
Promise Epoxy
Ships from
Promise Epoxy
Returns
30-day refund/replacement
This item can be returned in its original condition for a full refund or replacement within 30 days of receipt. You may receive a partial or no refund on used, damaged or materially different returns.
Payment
Secure transaction
Your transaction is secure
We work hard to protect your security and privacy. Our payment security system encrypts your information during transmission. We don’t share your credit card details with third-party sellers, and we don’t sell your information to others. Learn more
Save 10% now and up to 15% on repeat deliveries.
  • No fees
  • Cancel anytime
Learn more
Potential yearly savings :

Potential Savings

Potential Yearly Savings is an estimate based on your selected delivery frequency and the base discount. Actual savings may change based on delivery frequency and discount eligibility.

Pricing

While you will always receive a Subscribe & Save discount, individual product prices can go up or down over time. If the price of your subscribed product changes, the new price will be displayed in your order review email and will be applied only on future shipments. You can review your subscription price and edit or cancel your subscription at any time
Learn more
FREE delivery Sunday, February 23. Order within 54 mins
In Stock
Deliver every:
×

Added to cart

$$58.99 () Includes selected options. Includes initial monthly payment and selected options. Details
Price
Subtotal
$$58.99
Subtotal
Initial payment breakdown
Shipping cost, delivery date, and order total (including tax) shown at checkout.
Auto-deliveries sold by Promise Epoxy and Fulfilled by Amazon

Promise Epoxy Resin Kit 1 Gallon-Crystal Clear, UV Resistant, Self Leveling, Food Safe for Table Top, Arts and Crafts, Wood Casting, Jewelry Making, Use with Mica Powder, Silicone Molds, Alcohol Ink

4.4 4.4 out of 5 stars 32,650 ratings

$58.99 with 25 percent savings $0.46 per Fl Oz
List Price: $78.97
Coupon:  
Brief content visible, double tap to read full content.
Full content visible, double tap to read brief content.
Size: 1 Gal
Brief content visible, double tap to read full content.
Full content visible, double tap to read brief content.
Bundles with this item
{"desktop_buybox_group_1":[{"displayPrice":"$58.99","priceAmount":58.99,"currencySymbol":"$","integerValue":"58","decimalSeparator":".","fractionalValue":"99","symbolPosition":"left","hasSpace":false,"showFractionalPartIfEmpty":true,"offerListingId":"UVEi4kEqXrh0vPsIuje9esF8iM311JgzWJRzOLvc1PM7ldnIN%2FJa3lIF8a%2BImSTIG%2FV1NuckAc8%2FTie7tFrpxvAl1tiDf2f5Uyb%2FteNP4o3cxiR89R2UUS8c5R5x7n1jjWFMjCg8Tz%2Fd3tN9GFVWEi50B53Xs6yZcN%2BiOEeLLukSpcusqAY8xLEmtrTC4aVG","locale":"en-US","buyingOptionType":"NEW","aapiBuyingOptionIndex":0}, {"displayPrice":"$53.09","priceAmount":53.09,"currencySymbol":"$","integerValue":"53","decimalSeparator":".","fractionalValue":"09","symbolPosition":"left","hasSpace":false,"showFractionalPartIfEmpty":true,"offerListingId":null,"locale":"en-US","buyingOptionType":"SNS","aapiBuyingOptionIndex":1}]}

Purchase options and add-ons

Brand Promise Epoxy
Specific Uses For Product Table Top, Craft, Woodworking, Wood, Furniture, Countertop
Material Epoxy Resin
Compatible Material Wood, Plastic
Item Form Liquid

About this item

  • Easy Application Process - Enjoy the simplicity of a 1:1 mixing ratio with our epoxy resin kit, perfect for both beginners and experienced DIY enthusiasts. This user-friendly kit is a must-have addition to your resin art and craft projects.
  • Food-Safe Epoxy Resin - Our epoxy resin is food-safe when fully cured, making it an excellent choice for kitchen table tops, bar tops, and other food contact surfaces. Compatible with wood and metal, it ensures flawless clarity in your artistic ventures.
  • Self-Leveling Epoxy - Say goodbye to uneven pours with our self-leveling epoxy resin. Ideal for bartops, craft tables, countertop epoxy, and more, our resin guarantees a sleek, high-gloss finish.
  • Crystal-Clear Finish - Unleash your creativity with our epoxy resin's crystal-clear, high-gloss finish. Add a touch of sophistication to your tabletops, resin crafts, and more.
  • Water-Resistant and Durable - Protect your resin art and home décor from moisture damage with our water-resistant epoxy resin. Designed for daily use, it offers long-lasting protection and maintains the pristine condition of your projects.
  • American Made Quality - Promise Epoxy brings over 40 years of experience in epoxy resin craftsmanship, proudly based in the USA. Our focus on quality and formula perfection sets our products apart.

Frequently bought together

This item: Promise Epoxy Resin Kit 1 Gallon-Crystal Clear, UV Resistant, Self Leveling, Food Safe for Table Top, Arts and Crafts, Wood Casting, Jewelry Making, Use with Mica Powder, Silicone Molds, Alcohol Ink
$58.99 ($0.46/Fl Oz)
Get it as soon as Sunday, Feb 23
In Stock
Sold by Promise Epoxy and ships from Amazon Fulfillment.
+
$14.99
Get it as soon as Sunday, Feb 23
In Stock
Sold by XUXU64 and ships from Amazon Fulfillment.
Total price: $00
To see our price, add these items to your cart.
Details
Added to Cart
spCSRF_Treatment
These items are shipped from and sold by different sellers.
Choose items to buy together.

Product details

  • Is Discontinued By Manufacturer ‏ : ‎ No
  • Product Dimensions ‏ : ‎ 10 x 10 x 5 inches; 1 Pounds
  • Item model number ‏ : ‎ CECOMINOD097661
  • Date First Available ‏ : ‎ March 20, 2012
  • Manufacturer ‏ : ‎ Pro Marine Supplies
  • ASIN ‏ : ‎ B01LYK2NAG
  • Country of Origin ‏ : ‎ USA
  • Customer Reviews:
    4.4 4.4 out of 5 stars 32,650 ratings

From the brand


Product Description

Promise Epoxy Resin Smiling Face
The video showcases the product in use.The video guides you through product setup.The video compares multiple products.The video shows the product being unpacked.
Promise Epoxy Resin Features & Benefits
How to Use Promise Epoxy Resin
Endless possibilities with Promise Epoxy
Promise Epoxy Reviews

Promise Epoxy

Table Top Epoxy Resin

Promise Epoxy Resin

Epoxy resin with accessories

Promise Epoxy Resin Kit

Fast cure resin 1 gallon

Promise Fast Cure Resin

Promise Fast Cure Deep Pour 1 Gallon

Fast Cure Deep Pour

Promise Epoxy Deep Pour

Promise Deep Pour Epoxy

UV Resistant Epoxy Resin

Promise UV Art Epoxy

Promise Resin Remover

Promise Resin Quick Clean

Customer Reviews
4.4 out of 5 stars 32,650
4.4 out of 5 stars 1,558
4.0 out of 5 stars 97
4.2 out of 5 stars 31
4.5 out of 5 stars 428
4.3 out of 5 stars 310
4.2 out of 5 stars 88
Price
$58.99 $35.99 $55.99 $59.19 $94.99 $90.99 $16.14
Size
1-Gallon 64 Oz 1-Gallon 1-Gallon 1.5-Gallon 1-Gallon 8 oz
Pour Depth
Up to 1/4" Up to 1/4" Up to 1/8" Up to 3" (depending on temp) Up to 4" Up to 1/4"
Demold Time
24 Hours 24 Hours 1 Hour 24 Hours 3-5 Days 24 Hours
Work Time/Open Time
30-45 Minutes 30-45 Minutes 5-10 Minutes 20-30 Minutes 90 Minutes 25-30 Minutes
Total Cure Time
3-5 Days 3-5 Days 24 Hours 2-4 Days 7-10 Days 7 Days
Mix Ratio
1:1 by Volume 1:1 by Volume 1:1 by Volume 1:1 by Volume 2:1 by Volume 1:1
Viscosity
3,200 cP 3,200 cP 1,000 cP 2,000 cP 450 cP 1800 cP
Hardness
D81 D81 D73 D68 D80 D81
Heat Resistance
130F Heat Deflection Temp 130F Heat Deflection Temp 129F Heat Deflection Temp 130F Heat Deflection Temp
Made in USA
Crystal Clear
Self Leveling

Product guides and documents

Looking for specific info?

Customer reviews

4.4 out of 5 stars
32,650 global ratings

Review this product

Share your thoughts with other customers

Customers say

Customers find this bonding adhesive easy to use and durable. They find it works well, is simple to set up, and hardens quickly. Many customers are pleased with the results, describing the product as crystal clear and beautiful. While most appreciate its value for money, clarity, and ease of mixing, some have mixed opinions on bubble size.

AI-generated from the text of customer reviews

2,094 customers mention "Works great"2,094 positive0 negative

Customers are satisfied with the bonding adhesive. They say it works well, produces good results, and is suitable for various uses like table tops and boats.

"...Worked great. I don't think it came out with any more bubbles and they came out easily...." Read more

"...On the plus side, worked very well. Did as I wanted and expected...." Read more

"...Works great little elbow grease to mix but it comes out with a nice glassy finish once it cures." Read more

"...It is a little more expensive than most but the results were outstanding...." Read more

1,454 customers mention "Ease of use"1,294 positive160 negative

Customers find the bonding adhesive easy to work with and perfect for beginners. It requires no prep and sets up quickly. The website provides clear instructions and is helpful.

"...The bubbles come right out. It was a very easy process. However, don't do it once and leave it...." Read more

"...It will take 72 hours to fully cure, but the table will be hard to the touch in 24 hours. It will be beautiful when you are finished." Read more

"...Overall the product was easy to work with and if you have done this type of pour finish before, nothing here will surprise you...." Read more

"...To that, adding epoxy in layers is super easy, takes no prep other than keeping to clean and then pouring again within 24-36hrs...." Read more

1,169 customers mention "Durability"844 positive325 negative

Customers appreciate the durability of the bonding adhesives. They find the product has a good quality, doesn't have an overpowering smell, and dries overnight. The epoxy layer is holding well, and it's relatively firm and tacky. Overall, customers are satisfied with the product's performance and finish.

"...support with answering technical questions and the quality of the product is outstanding...." Read more

"...This stuff I poured set up exactly like directions said and was rock hard and not sticky 24 hours later...." Read more

"...This was my test run. It did not turn out perfect. However, the imperfections were 100% MY FAULT...." Read more

"It's a decent epoxy that cures relatively fast...." Read more

837 customers mention "Looks great"730 positive107 negative

Customers appreciate the product's appearance. They find it shiny and clean, with a smooth finish that sets nicely in 48 hours. The product allows for color customization and is relatively firm with a tacky surface.

"...first which was recommended and I think that really helps get a beautiful level coat...." Read more

"...I have used two of their resins and achieve the look I want with some simple prep. They mix easily and handle different colors really well...." Read more

"...Works great little elbow grease to mix but it comes out with a nice glassy finish once it cures." Read more

"...It does come out with an awesome looking finish but I have to admit, it’s a fairly expensive learning curve...." Read more

643 customers mention "Value for money"495 positive148 negative

Customers appreciate the value for money of this bonding adhesive. They find it affordable, messy, and a great way to recover old countertops. It saves them time and money.

"...I used about 1/3 of each bottle so it is a good value for a project like this. I like that it is food grade since it is used as a dining table." Read more

"...the work time is reasonable you get a good amount of product for the $...." Read more

"...with how this came out for my first epoxy project, and for the relatively low cost of this brand...." Read more

"...It is a little more expensive than most but the results were outstanding...." Read more

595 customers mention "Clarity"493 positive102 negative

Customers appreciate the clear finish of the bonding adhesive. They mention it's pure, crystal clear, and there are no bubbles or haze. The design and pictures they made come out very clear.

"...Cures hard and crystal clear. Definitely would buy again. No regrets...." Read more

"...I did 5 pours and the finish was clear with no yellowing or hazing...." Read more

"...Overall they came out with a great looking finish. Perfectly clear, almost like glass...." Read more

"...Rock solid, glassy surface, all the pictures are visibly crystal clear. This product is awesome!!!!!!!!..." Read more

444 customers mention "Mixability"357 positive87 negative

Customers find the epoxy easy to mix and pour. They mention it flows well and levels easily. The proper mixing ratio allows for fast layering.

"...They mix easily and handle different colors really well...." Read more

"...Not sure why but it was easy enough to mix by hand. This product turned very cloudy while mixing but as I kept going it cleared up again...." Read more

"...Part a is a bit thick but it melts in and mixes up lovely. The bubbles either go away or can easily be removed with heat gun...." Read more

"...To that, adding epoxy in layers is super easy, takes no prep other than keeping to clean and then pouring again within 24-36hrs...." Read more

740 customers mention "Bubble size"307 positive433 negative

Customers have different views on the bubble size. Some find it eliminates bubbles by being longer and more fluid, and laying flat with few bubbles. Others say there are lots of bubbles when mixing them.

"...That was stupid. Just creates one big air bubble - actually thousands that make the mix look like milk...." Read more

"...little difficult to mix and pour but it settles beautifully with almost no bubbles...." Read more

"...After the pour I had a extremely large amount of air bubbles. Last epoxy I bought I mixed with power drill and had very few bubbles...." Read more

"...This will get out ALL of the bubbles and make the resin 100% clear...." Read more

Product Worked Great - WARNING LONG POST
5 out of 5 stars
Product Worked Great - WARNING LONG POST
So I have been wanting Epoxy the top of my bar for some time. I have been saving ticket stubs to events I have attended for over 35 years. So, the last thing I wanted to do was screw this up. I read the reviews for LOTS of different products. What I found most helpful was reading about other peoples experiences with the product. Especially people who had never done this before. Therefore, I am going to go ahead and add to the product knowledge of this epoxy.First, I will say what many other posts said - FOLLOW THE DIRECTIONS. If you take short cut, you are going to pay the price. Your epoxy won't set or you will have other issues. So let's start with the mix. I did what everyone else had recommended. I affixed my ticket stubs to my bar counter tops. Now I should also mention this. I have a high counter top and a low counter top. I did a test run on my low counter top. On the lower counter top, I had taken CD jewel case covers (i had hundreds) and affixed them and did the same process. This was my test run. It did not turn out perfect. However, the imperfections were 100% MY FAULT. I read some 2 and 3 star ratings and looking back on them now, I would venture to say a lot of the screw ups I read were user error. Not trying to be hard on the DIY user, but much of the complaints I read were user screw ups. My test runs had issues because I didn't anticipate a lot of things. Now back to the mix. First, don't go cheap. Use a two new containers EVERY TIME you do a mix. My counter top was big - 2' x 10'. When I did my first test, I did it with a quart plastic mixing container. That would have taken me all night. I quickly switched to a 5 quart bucket. Get the ones that have the ounces marked on the side. I mixed batches 64 oz at a time. I did just like it said. Mix for 5 minutes and then transfer to a second - clean container and mix for 3 minutes. I just used Alexa for this part. About the mixing - this stuff is hard to mix together. I did my first batch or two with a paint stick. Eight minutes of that is brutal. I read a review with a guy who had used a paddle paint mixer on a drill. So, I decided to give it a try. First time, I screwed up. I thought use a high speed - full trigger - and get it mixed good. That was stupid. Just creates one big air bubble - actually thousands that make the mix look like milk. i was able to use a heat gun to get the bubble out. However, it took forever!!!! Second time, I just pulled the trigger until the paddle started spinning - lowest setting possible. I just moved it around and reversed the paddle every couple of minutes. Worked great. I don't think it came out with any more bubbles and they came out easily.Pouring the mixture was something most people didn't really talk about. When you do your seal coat, you can move it around with a blade. Be gentle or you will create valleys. Now on the flood coat, no one ever said to move the product around. The indication is that it is self-leveling. I would say that is accurate to a point. If you just pour it and let it run, it is going to stay really thick - between 3/8 inch and 1/2 inch. I didn't want it that thick. So, just like the seal coat, I moved it around again with a blade. I just used a 6 inch putty knife. This stuff is STICKY. I bought a 40 pack of rags from Home Depot and a gallon of denatured alcohol. I used this stuff a lot to wipe things off and clean up my putty knife. Once I poured out all the product on the bar top, I just worked it around making sure I got it up tight in the corners. I does self-level and it was just a thinner coat than the 1/2 inch.I used a heat gun to get out bubbles once I poured the epoxy out. I liked the gun because mine has a fan, think hairdryer, and covered more area. The bubbles come right out. It was a very easy process. However, don't do it once and leave it. You will get sneaky ones that creep up out of no where. I went back and checked it every 30 minutes for the first two hours of dry time.Ok, last couple of items. First, temperature - I kept the temp in my basement between 70 & 75 the entire time. Do what they say and don't let it go below 70. This will screw with the curing process. The final thing I would say is this. Once you have mixed it, the consistency is like thick honey. My bar is 3/4 inch laminated oak plywood. I have taken a piece of 1"x3" and made a half inch dado cut and used this trim piece to cover the edge of the ply wood. It fit really snug. I thought there was no way this was going to seep in, behind, down, and then back out of that piece of trim. Well, it did in a couple of places. if I was doing this again, I would run a bead of caulk on the under side of the bar to prevent those drips from happening. I was able to wipe it all up and keep the underside wiped down, but I had to do this for like two hours until the product got thick enough it no longer seeped out.Ok, sorry this is so long. But, i found the long review really helpful as I planned my project. I used two of the two gallon kits to do my upper and lower bar. Keep your environment as dust free as possible. Little threads and dust particles will get on the top and there is nothing you can do. This includes shutting heat vents in ceiling that are close to bar (learned that on my lower top.) . Final comment - TAKE YOUR TIME. This is not a go fast process. You have to be willing to go slow and be patient. I included a couple of pictures of the finished product. Love the way it turned out.
Thank you for your feedback
Sorry, there was an error
Sorry we couldn't load the review

Top reviews from the United States

  • Reviewed in the United States on January 23, 2025
    Used this to cover a round table that I did not like the look of. I used mica powders and resin dyes to create a mix of colors. This resin is super thick which makes it a little difficult to mix and pour but it settles beautifully with almost no bubbles. I did a thin coat brushing it on first which was recommended and I think that really helps get a beautiful level coat. I did not do more than one layer after that and this table didn’t require it so no sanding was necessary. I used about 1/3 of each bottle so it is a good value for a project like this. I like that it is food grade since it is used as a dining table.
    Customer image
    5.0 out of 5 stars
    Great table top epoxy

    Reviewed in the United States on January 23, 2025
    Used this to cover a round table that I did not like the look of. I used mica powders and resin dyes to create a mix of colors. This resin is super thick which makes it a little difficult to mix and pour but it settles beautifully with almost no bubbles. I did a thin coat brushing it on first which was recommended and I think that really helps get a beautiful level coat. I did not do more than one layer after that and this table didn’t require it so no sanding was necessary. I used about 1/3 of each bottle so it is a good value for a project like this. I like that it is food grade since it is used as a dining table.
    Images in this review
    Customer imageCustomer image
    One person found this helpful
    Report
  • Reviewed in the United States on January 6, 2025
    I started making Ocean Wave Charcuterie boards and Coasters for some friends and tried a few different resins. After some research I found Promise Epoxy and will be sticking with this brand. Excellent customer support with answering technical questions and the quality of the product is outstanding. I have used two of their resins and achieve the look I want with some simple prep. They mix easily and handle different colors really well. I will be expanding to do some deep pours for tables and other projects and will be using their products for those as well.
    Customer image
    5.0 out of 5 stars
    Predictable and consistent results!

    Reviewed in the United States on January 6, 2025
    I started making Ocean Wave Charcuterie boards and Coasters for some friends and tried a few different resins. After some research I found Promise Epoxy and will be sticking with this brand. Excellent customer support with answering technical questions and the quality of the product is outstanding. I have used two of their resins and achieve the look I want with some simple prep. They mix easily and handle different colors really well. I will be expanding to do some deep pours for tables and other projects and will be using their products for those as well.
    Images in this review
    Customer imageCustomer image
    5 people found this helpful
    Report
  • Reviewed in the United States on February 23, 2020
    So I have been wanting Epoxy the top of my bar for some time. I have been saving ticket stubs to events I have attended for over 35 years. So, the last thing I wanted to do was screw this up. I read the reviews for LOTS of different products. What I found most helpful was reading about other peoples experiences with the product. Especially people who had never done this before. Therefore, I am going to go ahead and add to the product knowledge of this epoxy.

    First, I will say what many other posts said - FOLLOW THE DIRECTIONS. If you take short cut, you are going to pay the price. Your epoxy won't set or you will have other issues. So let's start with the mix. I did what everyone else had recommended. I affixed my ticket stubs to my bar counter tops. Now I should also mention this. I have a high counter top and a low counter top. I did a test run on my low counter top. On the lower counter top, I had taken CD jewel case covers (i had hundreds) and affixed them and did the same process. This was my test run. It did not turn out perfect. However, the imperfections were 100% MY FAULT. I read some 2 and 3 star ratings and looking back on them now, I would venture to say a lot of the screw ups I read were user error. Not trying to be hard on the DIY user, but much of the complaints I read were user screw ups. My test runs had issues because I didn't anticipate a lot of things. Now back to the mix. First, don't go cheap. Use a two new containers EVERY TIME you do a mix. My counter top was big - 2' x 10'. When I did my first test, I did it with a quart plastic mixing container. That would have taken me all night. I quickly switched to a 5 quart bucket. Get the ones that have the ounces marked on the side. I mixed batches 64 oz at a time. I did just like it said. Mix for 5 minutes and then transfer to a second - clean container and mix for 3 minutes. I just used Alexa for this part. About the mixing - this stuff is hard to mix together. I did my first batch or two with a paint stick. Eight minutes of that is brutal. I read a review with a guy who had used a paddle paint mixer on a drill. So, I decided to give it a try. First time, I screwed up. I thought use a high speed - full trigger - and get it mixed good. That was stupid. Just creates one big air bubble - actually thousands that make the mix look like milk. i was able to use a heat gun to get the bubble out. However, it took forever!!!! Second time, I just pulled the trigger until the paddle started spinning - lowest setting possible. I just moved it around and reversed the paddle every couple of minutes. Worked great. I don't think it came out with any more bubbles and they came out easily.

    Pouring the mixture was something most people didn't really talk about. When you do your seal coat, you can move it around with a blade. Be gentle or you will create valleys. Now on the flood coat, no one ever said to move the product around. The indication is that it is self-leveling. I would say that is accurate to a point. If you just pour it and let it run, it is going to stay really thick - between 3/8 inch and 1/2 inch. I didn't want it that thick. So, just like the seal coat, I moved it around again with a blade. I just used a 6 inch putty knife. This stuff is STICKY. I bought a 40 pack of rags from Home Depot and a gallon of denatured alcohol. I used this stuff a lot to wipe things off and clean up my putty knife. Once I poured out all the product on the bar top, I just worked it around making sure I got it up tight in the corners. I does self-level and it was just a thinner coat than the 1/2 inch.

    I used a heat gun to get out bubbles once I poured the epoxy out. I liked the gun because mine has a fan, think hairdryer, and covered more area. The bubbles come right out. It was a very easy process. However, don't do it once and leave it. You will get sneaky ones that creep up out of no where. I went back and checked it every 30 minutes for the first two hours of dry time.

    Ok, last couple of items. First, temperature - I kept the temp in my basement between 70 & 75 the entire time. Do what they say and don't let it go below 70. This will screw with the curing process. The final thing I would say is this. Once you have mixed it, the consistency is like thick honey. My bar is 3/4 inch laminated oak plywood. I have taken a piece of 1"x3" and made a half inch dado cut and used this trim piece to cover the edge of the ply wood. It fit really snug. I thought there was no way this was going to seep in, behind, down, and then back out of that piece of trim. Well, it did in a couple of places. if I was doing this again, I would run a bead of caulk on the under side of the bar to prevent those drips from happening. I was able to wipe it all up and keep the underside wiped down, but I had to do this for like two hours until the product got thick enough it no longer seeped out.

    Ok, sorry this is so long. But, i found the long review really helpful as I planned my project. I used two of the two gallon kits to do my upper and lower bar. Keep your environment as dust free as possible. Little threads and dust particles will get on the top and there is nothing you can do. This includes shutting heat vents in ceiling that are close to bar (learned that on my lower top.) . Final comment - TAKE YOUR TIME. This is not a go fast process. You have to be willing to go slow and be patient. I included a couple of pictures of the finished product. Love the way it turned out.
    Customer image
    5.0 out of 5 stars
    Product Worked Great - WARNING LONG POST

    Reviewed in the United States on February 23, 2020
    So I have been wanting Epoxy the top of my bar for some time. I have been saving ticket stubs to events I have attended for over 35 years. So, the last thing I wanted to do was screw this up. I read the reviews for LOTS of different products. What I found most helpful was reading about other peoples experiences with the product. Especially people who had never done this before. Therefore, I am going to go ahead and add to the product knowledge of this epoxy.

    First, I will say what many other posts said - FOLLOW THE DIRECTIONS. If you take short cut, you are going to pay the price. Your epoxy won't set or you will have other issues. So let's start with the mix. I did what everyone else had recommended. I affixed my ticket stubs to my bar counter tops. Now I should also mention this. I have a high counter top and a low counter top. I did a test run on my low counter top. On the lower counter top, I had taken CD jewel case covers (i had hundreds) and affixed them and did the same process. This was my test run. It did not turn out perfect. However, the imperfections were 100% MY FAULT. I read some 2 and 3 star ratings and looking back on them now, I would venture to say a lot of the screw ups I read were user error. Not trying to be hard on the DIY user, but much of the complaints I read were user screw ups. My test runs had issues because I didn't anticipate a lot of things. Now back to the mix. First, don't go cheap. Use a two new containers EVERY TIME you do a mix. My counter top was big - 2' x 10'. When I did my first test, I did it with a quart plastic mixing container. That would have taken me all night. I quickly switched to a 5 quart bucket. Get the ones that have the ounces marked on the side. I mixed batches 64 oz at a time. I did just like it said. Mix for 5 minutes and then transfer to a second - clean container and mix for 3 minutes. I just used Alexa for this part. About the mixing - this stuff is hard to mix together. I did my first batch or two with a paint stick. Eight minutes of that is brutal. I read a review with a guy who had used a paddle paint mixer on a drill. So, I decided to give it a try. First time, I screwed up. I thought use a high speed - full trigger - and get it mixed good. That was stupid. Just creates one big air bubble - actually thousands that make the mix look like milk. i was able to use a heat gun to get the bubble out. However, it took forever!!!! Second time, I just pulled the trigger until the paddle started spinning - lowest setting possible. I just moved it around and reversed the paddle every couple of minutes. Worked great. I don't think it came out with any more bubbles and they came out easily.

    Pouring the mixture was something most people didn't really talk about. When you do your seal coat, you can move it around with a blade. Be gentle or you will create valleys. Now on the flood coat, no one ever said to move the product around. The indication is that it is self-leveling. I would say that is accurate to a point. If you just pour it and let it run, it is going to stay really thick - between 3/8 inch and 1/2 inch. I didn't want it that thick. So, just like the seal coat, I moved it around again with a blade. I just used a 6 inch putty knife. This stuff is STICKY. I bought a 40 pack of rags from Home Depot and a gallon of denatured alcohol. I used this stuff a lot to wipe things off and clean up my putty knife. Once I poured out all the product on the bar top, I just worked it around making sure I got it up tight in the corners. I does self-level and it was just a thinner coat than the 1/2 inch.

    I used a heat gun to get out bubbles once I poured the epoxy out. I liked the gun because mine has a fan, think hairdryer, and covered more area. The bubbles come right out. It was a very easy process. However, don't do it once and leave it. You will get sneaky ones that creep up out of no where. I went back and checked it every 30 minutes for the first two hours of dry time.

    Ok, last couple of items. First, temperature - I kept the temp in my basement between 70 & 75 the entire time. Do what they say and don't let it go below 70. This will screw with the curing process. The final thing I would say is this. Once you have mixed it, the consistency is like thick honey. My bar is 3/4 inch laminated oak plywood. I have taken a piece of 1"x3" and made a half inch dado cut and used this trim piece to cover the edge of the ply wood. It fit really snug. I thought there was no way this was going to seep in, behind, down, and then back out of that piece of trim. Well, it did in a couple of places. if I was doing this again, I would run a bead of caulk on the under side of the bar to prevent those drips from happening. I was able to wipe it all up and keep the underside wiped down, but I had to do this for like two hours until the product got thick enough it no longer seeped out.

    Ok, sorry this is so long. But, i found the long review really helpful as I planned my project. I used two of the two gallon kits to do my upper and lower bar. Keep your environment as dust free as possible. Little threads and dust particles will get on the top and there is nothing you can do. This includes shutting heat vents in ceiling that are close to bar (learned that on my lower top.) . Final comment - TAKE YOUR TIME. This is not a go fast process. You have to be willing to go slow and be patient. I included a couple of pictures of the finished product. Love the way it turned out.
    Images in this review
    Customer imageCustomer imageCustomer image
    526 people found this helpful
    Report
  • Reviewed in the United States on July 28, 2024
    Longer then expected.
    But worked for what i wanted.
    I just use this on plywood.
    Was planning to do this in sections but the directions said I had 30 to 40 minutes.
    I was almost done and was about 25 minutes into it when it gelled up.
    I was hoping to redo a few spots with what was left but ended up having to waste about 1/3 rd gallon.
    Didn't expect that.
    Also, directio s said no power tools for mixing.
    Not sure why but it was easy enough to mix by hand.
    This product turned very cloudy while mixing but as I kept going it cleared up again.
    After the pour I had a extremely large amount of air bubbles.
    Last epoxy I bought I mixed with power drill and had very few bubbles.
    On the plus side, worked very well.
    Did as I wanted and expected.
    Bubbles were not a problem since this was the first coat and won't be seen.
    The next day the epoxy was well setup and I sanded for the next coat.
    Just put the next coat on.
    Won't know til tomorrow how it comes out.
    8 people found this helpful
    Report
  • Reviewed in the United States on December 9, 2024
    I have tried sooo many resins. And this is one of the best I have used. Sometimes you needs to manipulate others to get it to work and it’s hit or miss with the dimples and such but I can say this resin has not given any issues . No fisheyes or dimples and mixes great. Part a is a bit thick but it melts in and mixes up lovely. The bubbles either go away or can easily be removed with heat gun. There is a little bit of a smell but nothing like some I have tried. It cures in the right amount of time. the work time is reasonable you get a good amount of product for the $. Overall no complaints this is a great resin and cannot recommend enough if searching for resin for tumblers
    Customer image
    5.0 out of 5 stars
    Amazing and beautiful for TUMBLERS

    Reviewed in the United States on December 9, 2024
    I have tried sooo many resins. And this is one of the best I have used. Sometimes you needs to manipulate others to get it to work and it’s hit or miss with the dimples and such but I can say this resin has not given any issues . No fisheyes or dimples and mixes great. Part a is a bit thick but it melts in and mixes up lovely. The bubbles either go away or can easily be removed with heat gun. There is a little bit of a smell but nothing like some I have tried. It cures in the right amount of time. the work time is reasonable you get a good amount of product for the $. Overall no complaints this is a great resin and cannot recommend enough if searching for resin for tumblers
    Images in this review
    Customer image
    13 people found this helpful
    Report

Top reviews from other countries

Translate all reviews to English
  • NA
    5.0 out of 5 stars Amazing product
    Reviewed in Canada on September 5, 2024
    Easy to use.
    Level self and did countertop looks amazing
  • Amazon Customer
    5.0 out of 5 stars Works well.
    Reviewed in Canada on February 19, 2024
    We made a counter top for a bar from 8 ft of maple with the bark left on. We pined any loose bark with a pin nailer. We brushed the bark first than did the pour and let run over the bark again. Made a very nice top.
  • Cesar
    5.0 out of 5 stars Entrega a tiempo y satisfecho.
    Reviewed in Mexico on January 13, 2024
    Entrega a tiempo y satisfecho con el producto, buen material.
  • Pranai Rai
    5.0 out of 5 stars Everything is going well so far.
    Reviewed in India on December 11, 2024
    Everything is going well so far. Just waiting for it to dry and hoping the final product meets expectations.

    Final Product is good
    Customer image
    Pranai Rai
    5.0 out of 5 stars
    Everything is going well so far.

    Reviewed in India on December 11, 2024
    Everything is going well so far. Just waiting for it to dry and hoping the final product meets expectations.

    Final Product is good
    Images in this review
    Customer imageCustomer image
  • 🤝
    5.0 out of 5 stars Great product
    Reviewed in Canada on January 28, 2021
    This product is great. Follow the directions and you won’t have a problem. I did use less than what they said and I did two coats. I did my bathroom integrated sink and it turned out beautiful. I sanded for a matte finish. It may stain more, but nothing bathroom cleaner can’t take out.
    UPDATE: After a year it turned yellow. :(
    Customer image
    🤝
    5.0 out of 5 stars
    Great product

    Reviewed in Canada on January 28, 2021
    This product is great. Follow the directions and you won’t have a problem. I did use less than what they said and I did two coats. I did my bathroom integrated sink and it turned out beautiful. I sanded for a matte finish. It may stain more, but nothing bathroom cleaner can’t take out.
    UPDATE: After a year it turned yellow. :(
    Images in this review
    Customer image