Updated April 2026
How to Fix Cloudy Resin Projects
Hi friends, it’s Natalie from Doodlecraft. It’s happened to even the best resin crafters… a cloudy resin finish. It’s super frustrating to spend all the time and money to make a project only to have the resin finish look dull and not shiny.
Don’t throw it away–It can be fixed! Here’s how to fix cloudy resin projects and how to avoid them on future projects. They will end up so shiny, you’ll be able to see your face shining in them!

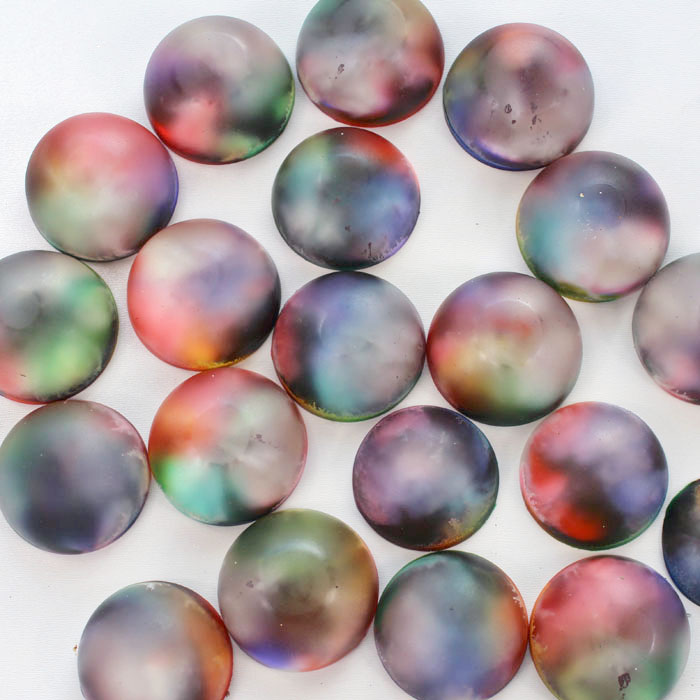
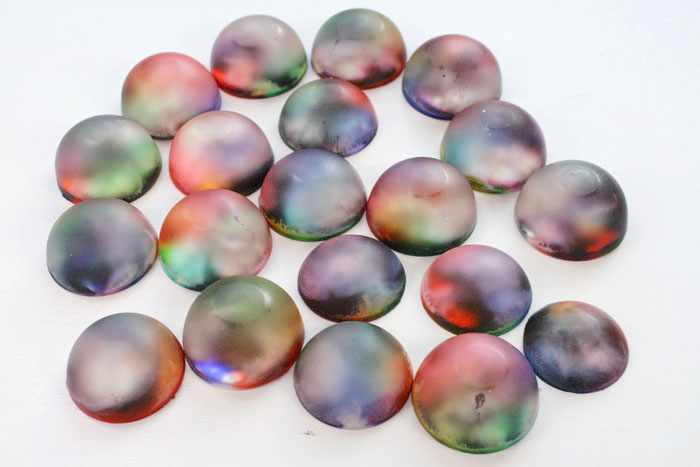
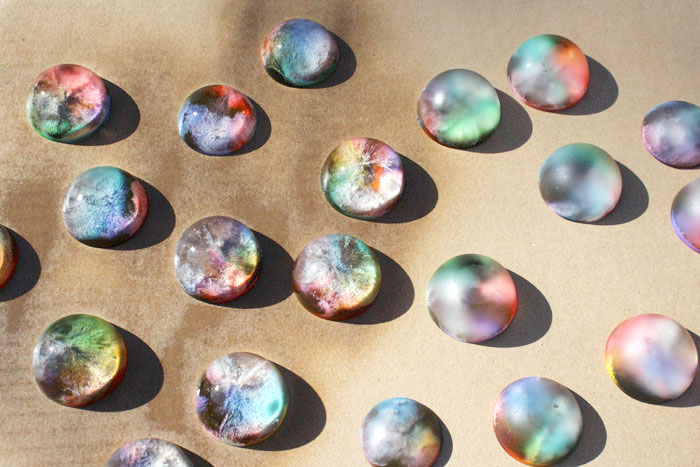
Here’s an example… I poured perfectly mixed resin into this half dome silicone mold. I dripped alcohol inks into them and waited. A day later, I popped them out only to be severely disappointed. They were all foggy. The finish was dull and hard to see the alcohol ink drips inside the orb.
WHY IS MY RESIN CLOUDY OR FOGGY?
Foggy resin projects can happen for a few reasons:
- Humidity or Excess Moisture
Do not work with resin if the humidity is above 75%. Make sure the mold is clean and completely dry before pouring.
- Texture and Finish of the Mold
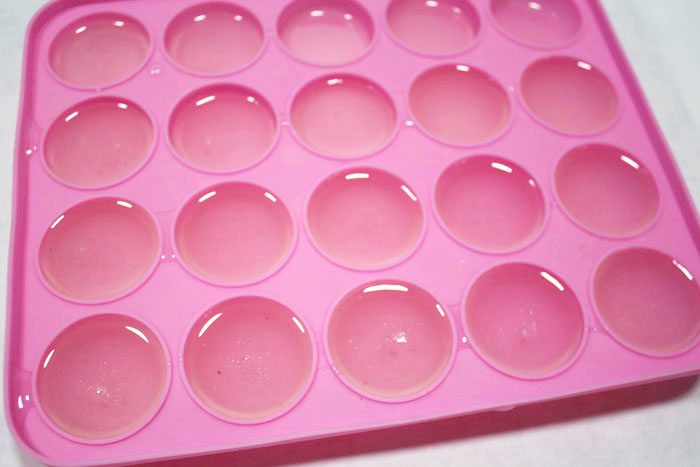
The mold can play a part in the finish. If the surface of your mold is shiny, the resin will be shiny. This silicone mold is very matte, therefore the resin turned out dull and matte.
- Temperature of the Resin
The resin must be the correct temperature for the correct finish. If it’s too cold, it can affect the finish. To warm up resin, place the bottles of resin and hardener into warm water and let the resin warm up a tad before mixing. The bottles should be warm to the touch prior to mixing. Do not heat it.
- Dull After Sanding
If the resin has been sanded down, the finish will appear dull and scratched. Use lighter and lighter grit sandpaper until the finish is very smooth. However, It will still be cloudy.
- Loads of Micro Air Bubbles*
Aggressive mixing can whip the resin infusing a lot of air and add many tiny bubbles into the resin. Just mix slowly and completely.
If the resin mold is large on the inside but only has a small opening in the top, it can be hard for the bubbles to escape to the top.
If the item embedded into the resin has gaps and holes (like a rose bud with lots of petals), the gaps make it hard for the bubbles to escape and it ends up very bubbly.
The bubble issue cannot be fixed by the following solution alone, but check out this post for tips to avoid bubbles.
Okay, we know how to avoid cloudy finish in the future…but what about this project Did I just ruin it?!
Wait, it’s NOT ruined!
HERE’S THE SOLUTION:
Coat or Spray the Resin Project with Resin! I’ll show you the easiest and quickest way to fix the issue.
You’ll want this Resin Spray Sealer
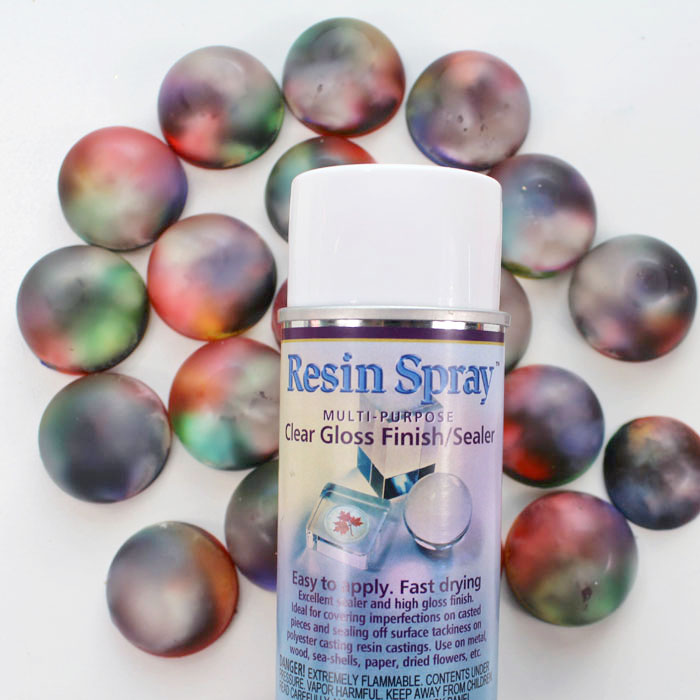
Place the resin project in a cardboard box and take it outdoors. Make sure that you are working in a warm temperature with no more than 75% humidity.
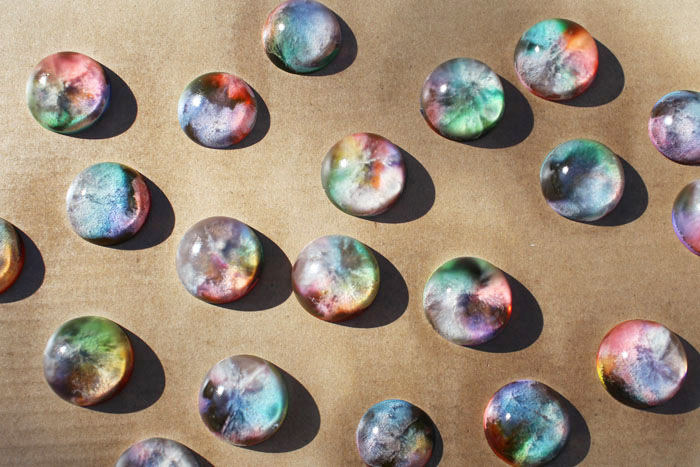
Shake the can for 1 minute. Remove the lid and hold about 6-8 inches away from the project while spraying. Then spray the resin lightly with the Resin Spray. Do several light coats of Resin Spray, not a heavy coat. Let the resin dry about 10 minutes and then add another coat.
Look at the difference from the shiny ones on the left versus the unsprayed ones on the right! Instantly the alcohol ink appears and they look amazing!
Repeat for the entire project. These domes just needed 2 light coats of Resin Spray to get shiny and look their best!
ANOTHER SOLUTION:
If you don’t have any Resin Spray (which I highly recommend), you can mix a small amount of the resin you used to cast your project. Then use a paintbrush (that you will throw away after using) and paint a light layer over the top of your project. This will add that shine back. Then let it dry again for 24-48 hours in a covered box. You can also pour a thin “flood coat” over the completed, cloudy project.
Check out this post, Geometric Crystal Resin Wood Bookend, that got shined up using the same Resin Spray. This spray is wonderful! Spray it on rocks to give them a fully polished look without using a rock tumbler–check out this rock post.
Save this information for later! If you haven’t had this happen to you before, it probably will in the future and you’ll know exactly what to do to fix your cloudy resin project.
Natalie Shaw is a Craft/DIY blogger at Doodlecraftblog.com. She loves sci-fi, fantasy and video game geekery and that comes out in many of her projects. She posts budget conscious DIY’s, crafts, jewelry, kid friendly projects, upcycled treasures and other fun on her blog 5 days a week.


I thought the matte finish was pretty cool. And you achieved it without a lot of sanding????
However, the tips are great.
Some of my resin turned out cloudy and some is clear mix from the same batch of resin I’m curious to know maybe you can tell me why or what I did wrong
Hi Candace! Was it all mixed at the same time? Were there any additives added to one of them and not the other? Were the finishes of the molds you used different?
That has happened to me too. The only thing different is the mold. The cloudy one is a silicone mat for Dodd to have their food in, that I got at the pet store. It seems like that must be the issue. I need a new mold
Yes that’s right. Whatever the finish of the mold is will be the finish of the project.
Hi Candace
Thanks for your great work on the blog!
My resin project is very dull after sanding and polishing.
I have tried and tried but without any success.
It 1 meter x 50 cm project, I wish I never sanded in the first place, I polished it with autoglym super resin polish but every time I finish sanding and polishing it gets worse and worse, don’t know what else to do.
Can you help please!
Could it be cloudy because there are bubbles inside? Usually sanding or pouring a flood coat does the trick!
Hello you say silicon mould is matte so how can I clean my mould and there is any issue about resin and their quality?
It’s not really a matter of the mold being clean, it’s the finish they applied when creating the mold. Sanding down areas of the resin will also cause cloudiness, so having High Gloss Resin Spray on hand is perfect for all those possibilities.
What spray do you recommend now? Seems this spray (Castin Craft) has been discontinued.
Hi Nat! It’s being repackaged but this is the same product: https://eti-usa.com/envirotex-spray-clear-sealer/
Hi the article is really helpful but I was wondering whether adding a new coat of resin on top would make anything underneath the cloudy layer visible? I created three moulds with resin poured over fabric flowers. One mould was perfectly clear but the other two went cloudy on top (only thing I can think of is they were damp). Would pouring resin over the two cloudy pieces make the flowers visible or just create a shiny finish? Many thanks!
Hi Pippa! It’s hard to say for sure but it does sound like it could have been a humidity issue. If it’s jus the surface that’s cloudy it would work, but if it’s below the surface it would just create a shiny finish.
Can I use also this? https://www.amazon.com/dp/B003W0A19U/ref=aod_recs_desktop_prsubs_3
Hi Miriam, we don’t have any experience with that product, we’re sorry we can’t give you an answer!